Cloning a user in User Administration
Use the Clone User feature to create a new user with access and permissions similar to an existing user. For example, you have a day shift manager (Manager A) and a night shift manager (Manager B), and you want them to have the same level of access within the Unifocus software. After you create an account for Manager A, you can clone Manager A's account to create a new user account for Manager B.
Note: Passwords are no longer created or managed by Unifocus user administrators. The user creates their own password when they click the link in the invitation email. If the user forgets their password, they can reset it by clicking the Forgot Password link on the Sign In screen.
Newly created users cannot log in until:
- The account is made active. For more information, see Activating and deactivating a user in User Administration.
- They complete their account registration and create a password using the link in the invitation email. For more information, see Sending an invitation email in User Administration.
To clone a user:
-
In the upper-left corner of the screen, select Access your applications (
 ).
).
The menu expands. -
Select Administration > User Administration.
The User Administration screen appears.
-
In the left menu pane, select Manage Users (
 ). This is the default view for the screen.
 Click here for field descriptions.
* Personally identifiable information has been obscured or altered in the above image.
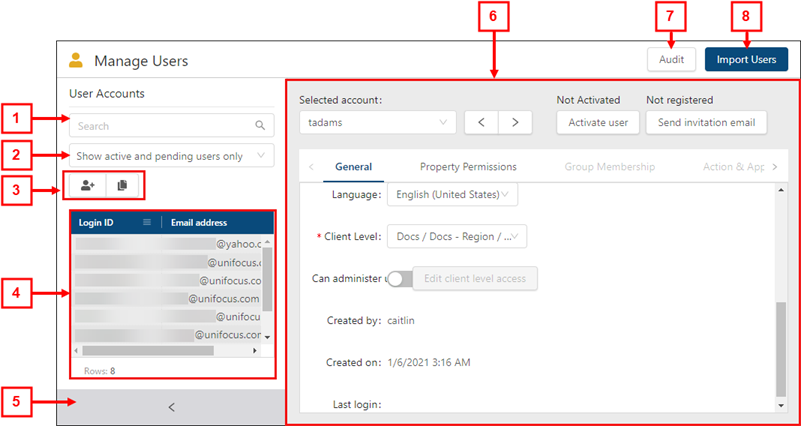
Fields on the Manage Users view of the User Administration screen
# Field Description Notes 1

Search
Type your search criteria in the field. The table automatically updates to meet the search criteria.
Search criteria includes login ID, email address, last name, first name, and middle name.
2
Filter
Filter the User Accounts list by:
-
Show active and pending users only
-
Show inactive users only
-
Show all users
Default: Show active users only.
3
User Accounts controls
Add or clone a user account.
-
Add User (
 )—Create a new user.
 -
Clone User (
 )—Create a new user by making a copy of an existing user.
4
User Accounts list
Displays all existing user accounts by Login ID and the email address that is associated with the user. Select a user to view details in the tabs.
5
 /
/ 
Expand / Collapse
Expand or collapse the User Accounts pane.
6
Selected account
Displays the Login ID for the selected user account. From the drop-down list, you can select a different user account to view details.
7
 /
/ 
Previous / Next
View details for the previous (
) or next () user account in the list.
8
Activation status
Activate or deactivate the user. If the user is not active, they cannot log in to the Unifocus software.
-
Not Activated—If the user is not active, the status is Not Activated. To activate the user, select the Activate user button below the status.
-
Activated—If the user is active, the status displays the date that the user was activated. To deactivate the user, select the Deactivate user button below the status.
-
Deactivated—If the user was deactivated, the status displays the date that the user was deactivated. To reactivate the user, select the Activate user button below the status.
9
Send Invitation Email
Send an invitation email to the email address associated with the user account. The user is invited to register and create a password for their account.
10
Audit
View a history of changes to the screen.
11
Import Users
Create multiple users by importing a spreadsheet that contains user information.
12
Tabs
Navigate the tabs to view or edit details for the selected user.
-
General
-
Property Permissions
-
Group Membership
-
Action & Application Access
-
Data Permissions
-
Authorization Levels
-
Labor Structure Permissions
-
Budget Lines Access Rights
The available tabs depend on which view you are using.
-
-
From the User Accounts list, select the user that you want to clone.
Details for the selected employee appear in the right pane. -
Select Clone User (
).
The Clone User dialog box appears.Click here for field descriptions.
Fields on the Clone User dialog box for the User Administration screen
Field Description Notes Login ID
Username that the user will enter to log into RMS.
Required.
Email Address
Email address to associate with the user.
Required.
Mobile Phone
Contact number for the user's mobile phone.
Last Name
Last name of the user.
First Name
First name of the user.
Middle Name
Middle name or initial of the user.
Language
Select the user's preferred language.
When the user logs in, the application displays in the selected language if translations are available.
Client Level
Select the databases and properties that the user can access.
For example, if your company owns Brand A and Brand B, you can give the user access to: Brand A only, Brand B only, or both Brands A and B.
Required.
Can administer users
If enabled, the user can modify and assign permissions to other users.
Edit client level access
Opens the Edit user administration permissions dialog box where you can adjust the client levels in which the user can administer other users.
This button is available only if Can administer users is ON (
 ).
).Cancel
Closes the dialog box without applying your changes.
OK
Applies your changes and closes the dialog box.
-
(Required) Enter a Login ID for the user.
-
(Required) Enter an Email address to associate with the user.
-
Enter a Mobile Phone number to associate with the user.
-
Enter the user's Last Name.
-
Enter the user's First Name.
-
Enter the user's Middle Name.
-
Select the user's preferred Language.
When the user logs in, the application displays in the selected language if translations are available. -
(Required) Select the user's Client Level.
-
To permit the user to modify and assign permissions to other users, enable Can administer users(
). -
To configure the client levels at which the user can modify and assign permissions to other users,
Select Edit client level access.
The Edit user administration permissions dialog box appears.To add client level access,
Select Add client level.
The Add user administration permission dialog box appears.From the drop-down list in the Add user administration permission dialog box, select a database or property to add to the list.
Select Add.
The selected client level is added to the list.
To remove client level access,
Select Remove (
 ) in the Remove access column.
The client level access is removed.
Select OK to save your changes.
The Edit user administration permissions dialog box closes, and you are returned to the Clone User dialog box.
-
Select OK.
The dialog box closes, and the user account is created.