Creating a notification
In RMS, a notification is an automated message that informs users of important system information. For example, users might receive biweekly notifications for when the variance between actual and standard hours exceeds a configured threshold. For a limited time, notifications appear in the Alerts pane. From the Alerts pane users can view additional details and, if required, acknowledge receipt of a notification.
You create and configure notifications on the Notifications Setup screen. During setup, you can specify which manager- and administrator-level users receive notifications and whether users must acknowledge the notifications.
To create a notification:
-
In the upper-left corner of the screen, select Access your applications (
 ).
).
The menu expands. -
Select Notifications>Notifications Setup.
The Notifications Setup screen appears.
- Select Create Notification.
The Create New Notification wizard appears. The first screen is 1. General. -
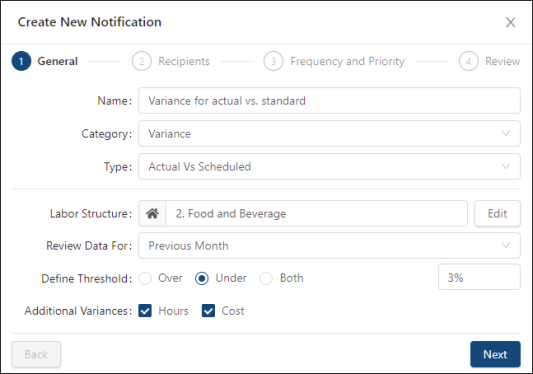
On General screen, enter the general information for the notification: name, category, and type.
Additional fields appear based on your selections. Field descriptions of the 1. General screen:
Fields on the 1. General screen of the Create New/Edit/Duplicate Notification wizard
Field Description Notes Name
Name of the notification.
Category
Select the category for the notifications. Options include:
-
All
-
Variance
Note:Currently, the only available category is Variance. New categories will be added in future releases.
Type
Type associated with the selected category. Options include: All
Actual vs. Budget Dataset—Variance between actual hours and budgeted hours for a chosen budget dataset.
Actual vs. Scheduled—Variance between actual hours and scheduled hours.
Scheduled vs. Projected—Variance between scheduled hours and projected hours.
Actual vs. Standard—Variance between actual hours and standard hours.
Options vary depending on your category selection.
Labor Structure / Edit
Specify the levels of the labor structure that will receive the notification.
Select Edit to open the Select Labor Structure dialog box, where you select the levels of the labor structure.
This field appears only if you select a Type associated with a Variance Category.
Budget Dataset
Budget dataset associated with the selected labor structure.
This field appears only if you select Actual Vs Budget Dataset as the Type for the Variance Category.
Review Data For
Select the time frame for which to view data. Options include:
-
Tomorrow
-
Next Week
-
Current Week
-
Next Month
-
Current Month
This field appears only if you select a Type associated with a Variance Category.
Define Threshold
Select the threshold settings:
-
Range options:
-
Over—Display data that is over the threshold.
-
Under—Display data that is under the threshold.
-
Both—Display data that is both under and over the threshold.
-
-
%—Specify the percentage threshold. For example, if you selected the Over option and enter 8% as the percentage, the notification will be triggered when variance is over by 8% or more.
This field appears only if you select a Type associated with a Variance Category.
The % default depends on the selected Category and Type.
If you select Both as a Define Threshold option, two % fields appear.
Addition Variances
Select one or both options:
-
Hours
-
Cost
This field appears only if you select a Type associated with a Variance Category.
Back
Return to the previous screen in the wizard.
This button is unavailable on the first screen of the wizard.
Next
Go to the next screen in the wizard.
This button is available only if you have entered data into all required fields.
-
-
Select Next.
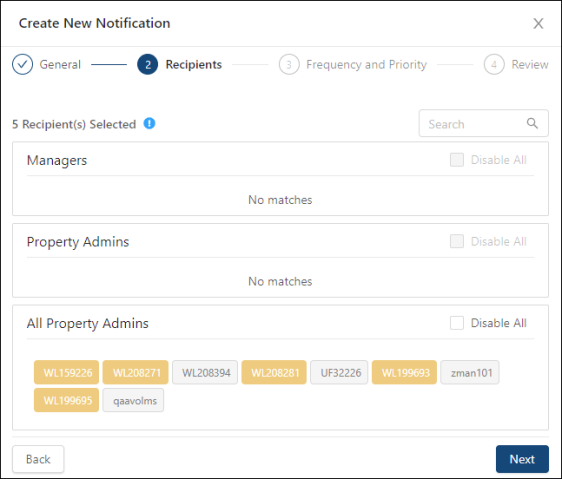
The 2. Recipients screen appears. -
On the Recipients screen, specify which users should receive the notification. By default, all available users are selected to receive the notifications. To exclude users from the notification, either select to disable the individual tags or select Disable All to ensure that no users in the permission level receive the notification.
Field descriptions of the 2. Recipients screen:
Fields on the 2. Recipients screen of the Create New/Edit/Duplicate Notification wizard
Note: By default, all users with Manager, Property Administrator, and All Property Administrator are displayed and selected.
Field Description Notes Search
Search by user ID. As you type, the sections update based on your entry.
Managers
-
Managers—Each tag lists the user ID with Manager permission. Select individual tags to remove the person from the recipient list.
-
Disable All—Removes all Managers from the recipient list.
Default: All users with Manager permissions at the selected labor structure level are displayed and selected.
Gray tags indicate that the user has been removed from the recipient list.
Property Admins
-
Property Admins—Each tag lists the user ID with Property Administrator permission.
-
Disable All—Removes all Property Administrators from the recipient list.
Default: All users with Property Administrator permissions at the selected labor structure level are displayed and selected.
Gray tags indicate that the user has been removed from the recipient list.
All Property Admins
-
All Property Admins—Each tag lists the user ID with All Property Administrator permission.
-
Disable All—Removes all All Property Administrators from the recipient list.
Default: All users with All Property Administrator permissions at the selected labor structure level are displayed and selected.
Gray tags indicate that the user has been removed from the recipient list.
Back
Return to the previous screen in the wizard.
Next
Go to the next screen in the wizard.
This button is available only if you have entered data into all required fields.
-
-
Select Next.
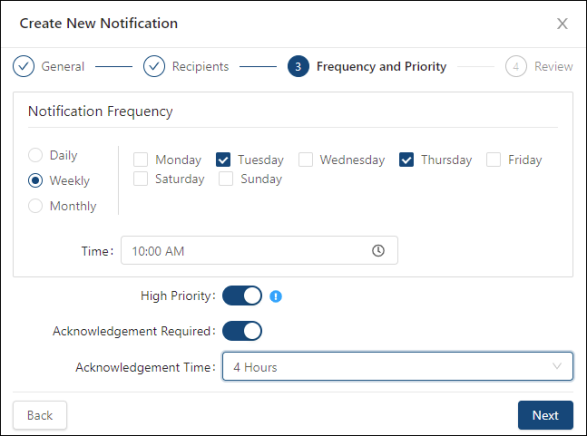
The 3. Frequency and Priority screen appears. -
On the Frequency and Priority screen, specify how frequently the software will check the categories and types configured on the General screen of the wizard.
Note: Notification Frequency does not necessarily indicate the frequency that users will receive notifications. It specifies how frequently the software checks for the configured categories and types that you entered in the General screen of the wizard. Users receive notifications only if the results are outside of the configured conditions.
Field descriptions of the 3. Frequency and Priority screen.
Fields on the 3. Frequency and Priority screen of the Create New/Edit/Duplicate Notification wizard
Field Description Notes Notification Frequency
-
Frequency—Select one of the following options to specify how frequently the software will check the categories and types configured on the General screen of the wizard.
-
Daily—Specify the frequency of weekdays.
-
Weekly—Select the days of the week.
-
Monthly—Specify the days of the month.
-
-
Time Zone—Specify the time zone associated with the time.
-
Time—Enter the time of day.
Note: Notification Frequency does not necessarily indicate the frequency that users will receive notifications. It specifies how frequently the software checks for the configured categories and types that you entered in the General screen of the wizard. Users receive notifications only if the results are outside of the configured thresholds.
The fields to the right of the frequency options change depending on the option you select.
The Time Zone field appears only if Master was selected as the Labor Structure Type in the General screen of the wizard. If Property was selected, the Time Zone field does not appear, and the time zone is automatically set to the user's property.
High Priority
Turn on (
 ) to indicate to the recipients that the notification is important.
Default: Off (
 ).
).Acknowledgment Required
Turn on (
) to require acknowledgment from recipients. Default: Off (
).Acknowledgment Time
Select the number of hours that the recipients are given to acknowledge the notification.
This field is available only if Acknowledgment Required is turned on.
Back
Return to the previous screen in the wizard.
Next
Go to the next screen in the wizard.
This button is available only if you have entered data into all required fields.
-
-
Select Next.
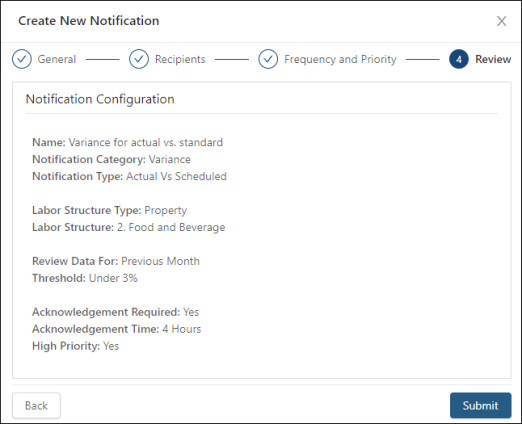
The Review screen appears. It displays a summary of your notification. -
Review the read-only information on the Review screen. If your need to edit your notification, select Back and edit the previous wizard screen as necessary.
Field descriptions of the 4. Review screen:
Fields on the 4. Review screen of the Create New/Edit/Duplicate Notification wizard
Field Description Notes Name
Name of the notification.
Read-only.
Notification Category
Category of the notification.
Read-only.
Notification Type
Type associated with the selected Category.
Read-only.
Labor Structure Type
Labor structure type: Property or Master.
Read-only.
Labor Structure
Selected labor structure level.
Read-only.
Review Data For
Time frame for which to review data.
Read-only.
Threshold
Defined threshold for notification.
Read-only.
Acknowledgment Required
Yes or No—Whether or not the notification requires acknowledgment by recipients.
Read-only.
Acknowledgment Time
Number of hours that the recipients are given to acknowledge the notification.
Read-only.
High Priority
Yes or No—Whether or not the notification is marked as high priority.
Read-only.
Back
Return to the previous screen in the wizard.
Submit
Submit your notification configuration and close the wizard.
This button is available only if you have entered data into all required fields.
-
Select Submit.
A Success message appears. Your notification is saved.