Recipients tab on the New Checklist pane
In the Recipients Email Address, enter the email addresses to which you want to send a report each time an inspector completes the checklist. You also save and activate the checklist from this tab, allowing inspectors to access and complete the checklist. For more information, see Adding a checklist.
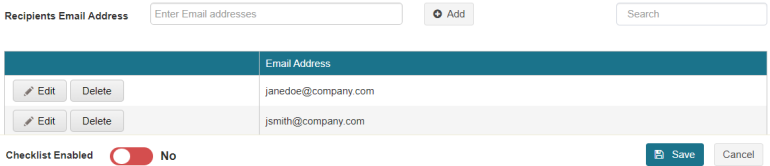
Fields on the Recipients tab
| Field | Description | Notes |
|---|---|---|
|
Recipients Email Address |
Enter the email address for the person to whom you want to send a report upon completion of the checklist. You can enter multiple email addresses at once, separated by a comma. |
Add an email addresses with an increased domain character limit of 8 characters. |

Add |
Saves the email address that you entered in the Recipients Email Address field to the table. |
|
|
Search |
Begin typing an email address in the field. The table automatically updates to meet the search criteria. |
|
|
Actions |
Options for saved rows include:
Options when editing a row include:
|
|
|
Email Address |
Displays the email addresses of all recipients. |
|
|
Checklist Enabled— No/Yes |
Must be set to Yes ( |
Default: No ( |
|
Save |
Saves your checklist and closes the New Checklist pane. |
|
|
Cancel |
Closes the pane without saving your checklist. |
 )—Change the Display Text or Value for the row.
 )—Save your changes.
 )—Closes the row without saving changes.
 /
/ 