Clone PM screen
This page describes the fields that you encounter when cloning a PM in the PM Console of the Maintenance software.
Note: The Clone PM screen contains the same fields as the New PM and Edit PM screens.
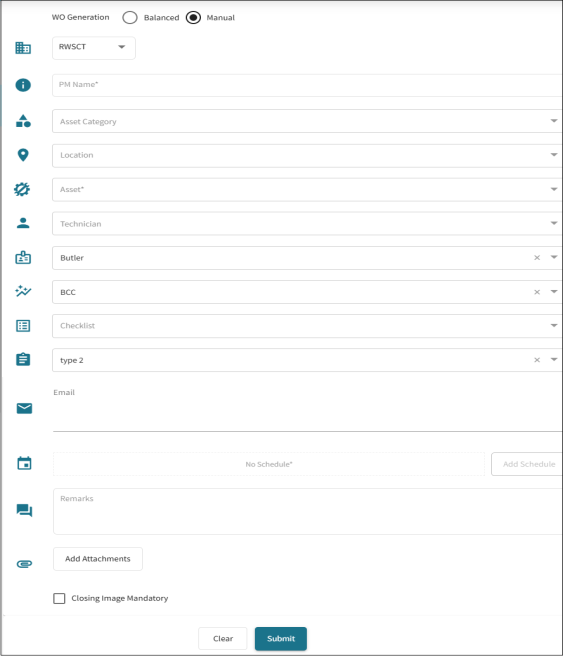
Fields on the New/Edit/Clone PM screen
Note: If you are adding a new PM, these fields appear on the New PM screen. If you are editing a PM, these fields appear on the Edit PM screen. If you are cloning a PM, these fields appear on the Clone PM screen.
| Field | Description | Notes |
|---|---|---|
|
Work Order Generation |
Select how work order are generated for preventive maintenance tasks. Options include:
The choice between these two options depends on the nature of the PM tasks and how they fit into the maintenance strategy of the organization. Balanced is suitable for tasks with regular, predictable schedules, while Manual provides greater control when scheduling is more variable or responsive to specific circumstances. |
|
|
Property |
Select the property on which the new PM will be completed. |
This field appears only on New PM screen. |
|
PM Name |
Enter a name or title of the PM. |
Required. |
|
Asset Category |
Select the category for which to view assets in the selected locations. |
|
|
Location |
Select the physical locations where assets will be applied. |
|
|
Asset |
Select the asset to be associated with the PM. |
Required. If you are editing or cloning a PM, the right side of the screen displays all associated assets. |
|
Technician |
Select the technician who will perform the PM. |
|
|
Department |
Select the department to be associated with the PM. |
|
|
Skills |
Select the skill required to perform the PM. |
|
|
Checklist |
Select one or multiple checklists to associate with the PM. |
|
|
PM Type |
Select the type of PM that is being created. |
|
| Enter an email address for sending notifications about completed PM work orders. | ||
|
Add Schedule |
Opens the Schedule dialog box where you configure the schedule for the PM. A schedule can be configured in one of two ways, as a Pattern- or Gap-based schedule.
For more information, see Creating a new PM. |
Required.
You can schedule Preventive Maintenance (PM) work orders only for current or future dates. |
|
Remarks |
Enter additional comments about the PM. |
|
|
Add Attachments |
Opens a file manager window where you can upload attachments to associate with the PM. |
|
|
Closing Image Mandatory |
Select if an attached image is required to close PM. |
|
| Clear |
Clears any entries you made on the screen. |
|
| Submit |
Submits your changes. |


