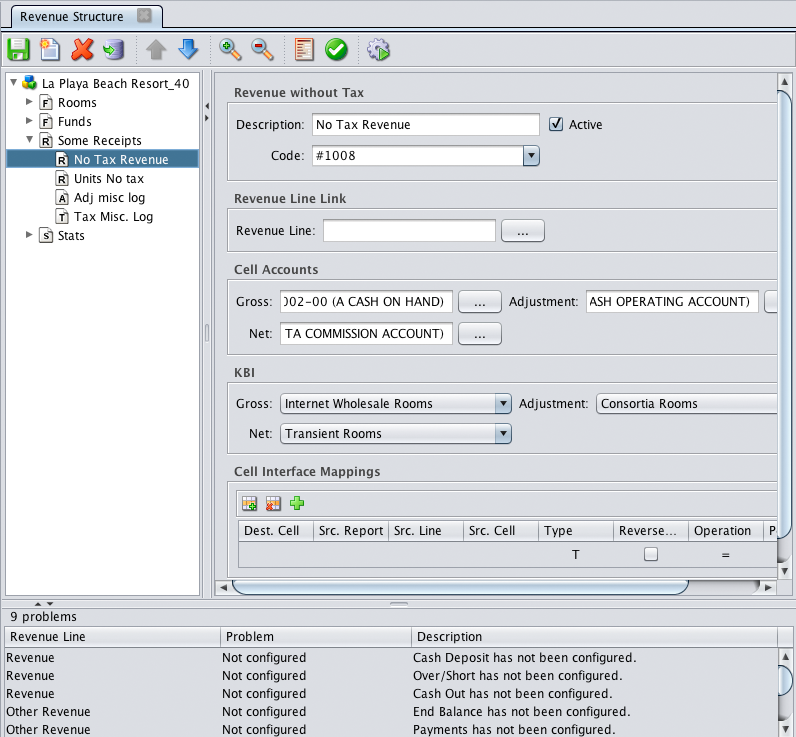
Revenue Structure

About the Revenue Structure

The Revenue Structure consists of a hierarchy of revenue lines which you create. The lines at the top level consist of Primary Types: Receipts, Funds and/or Statistics lines. Lines below the top level consist of other available line types, Secondary Types.

Line types determine how each revenue line behaves. Most of the revenue lines can have children and you can have as many levels and revenue lines as you need.
  Click image to view a full size screen shot.

Fields on the Revenue Structure screen

Each Line Type has it's own set of configuration criteria, therefore the items listed below may be different than what you see.

Field Description

Line Type (Label changes depending on the revenue line)

Allows you to configure general information about the revenue line.

  • Description. Allows you to identify the line.
  • Code. Allows you to select an alternate identifier for the revenue line. Pre-determined codes, in addition to the line's current Code, are available for selection. RMS requires that certain Codes be configured or data may be displayed incorrectly (see Required Revenue Line Codes).
  • Units. (only found in some Revenue Line Types) Allows you to track statistics. To accurately track statistics, all similar lines should be set to the same type of Units. For example, if you want to track number of Rooms, create an Integer Statistic line called Total Rooms Occupied, and then create children that are more specific (Singles, Multis, Comps, etc.). When configuring these lines, you must select Rooms as the Units type for all the lines (parent and children).
  • Journal Entry. Tells RMS that you want a journal entry made for this line.
  • Active. Denotes whether the revenue line is active or not.

Revenue Line Link                 

Allows you to associate a revenue line with another revenue line.

  • None. Allows you to choose not to link the revenue line.
  • Budget Line. Allows you to associate a budget line with the revenue line, which in turn allows the data that is input, to flow into Budgeting. For example, if you have a revenue line for Breakfast, you would want to associate the line with the Breakfast budget line so that when you enter data via tape entry or importing, that data is flowed into the Actuals field for the Breakfast KBI

Cell Accounts

Allows you to associate an account code with the cells in a revenue line, which in turn allows data to flow into the appropriate account in your accounting system. See the individual line types for available accounts for each line type.

Cell Offset Accounts

Allows you to designate an account as the offset for the normal data. See the individual line types for available offset accounts for each line type.

KBI

Allows you to associate a KBI with the revenue line which in turn allows the actual data that is input, to flow into Labor and/or Budgeting. For example, if you have a revenue line for Breakfast, you would want to associate the line with the Breakfast KBI so that when you enter data via tape entry or importing, that data is flowed into the appropriate Actuals field for the Breakfast KBI.

Cell Interface Mappings

Allows you to tell RMS the location of the data source for that cell and any operations that will be applied to the source data.

  • Dest. Cell. Name of the cell to which the data is being imported.
  • Src. Report. Outside system report from which the data will be imported.
  • Src. Line/Src. Cell. Specific line and cell from the source report from which the data will be imported.
  • Type. Allows you to tell Revenue whether you want to manually enter data (T) or import data (P) for this line.
  • Reverse Sign. Allows you to override the default sign. By default, Revenue imports the amount as is. However there may be a situation where you want an item to show with the sign reversed. An example of when this may be used is to show bad debt write-offs or a credit (refund) to an item that is normally entered as a positive. Do not reverse the sign for adjustments to revenue. Revenue calculates net revenue as gross minus adjustments. If you reverse the adjustments, your net revenue will be higher than the gross amount and you will not balance. Additionally, do not change the sign for entries that are usually positive but happen to be negative every now and then. The Import screen allows you to import/enter a negative sign on a particular day for an item that is configured as positive.
  • Operation. There are four types of calculation methods:
    • Default (=)
    • Multiply by a percentage ( * )
    • Back out Gross ( / )
    • Back out Tax (R) 

      The default, method simply takes the amount entered or imported into the main Revenue screens. For example, if fax revenue is $45 and the calculation method (operand) is set to =, the manual entry will import $45 to the fax revenue line.

      Back Out Gross (Division) and Back Out Tax (Reversal) must be entered to compliment each other just as they multiply by a percentage. These two methods provide a division by a percentage and the reversal for the offset.

      The best example of when to use these is to calculate tax for revenue items that are given from the PMS and POS including the tax in their amounts. The most common example of this is beverage revenue. Many POS's denote the amount of beverage revenue including the tax. Use the combination of these two functions to net the revenue and figure the tax. Refer to the example below for setting up the two entries.

      The POS denotes beverage revenue as $500 for the day. This includes the 15.5% tax on liquor. You must set up two entries such as:

      Operand               Desc.                %                   Calculation            Result             Result Desc.
           /               Back Out Gross      15.5                 500 / 1.155          $432.90              Revenue
          R                Back Out Tax        15.5             500/ (1.155/.155)       $67.10                  Tax 
       In order for this to correctly calculate from the entry screen, the following two items must be true:
           - Both the initial division (Gross) and the reversal (Tax) MUST be the same percentage.
           - Both entries on the Manual entry screen must be the same. (In the above example, you would enter $500 twice on the Manual entry screen)
  • Percentage. Denotes the percentage amount that the Operation will use in the calculations.

Extra

Allows you to enter pertinent data not covered in the other areas.

Problems/Message Area

Displays messages denoting problems in your configuration. This list includes all configuration problems, not just those pertaining to a specific revenue line. There are four types of messages:

  • Gross/Adjustment/Net. Denotes you have configured both Gross and Adjustment, as well as Net in the Account Cell. You can configure Gross and Adjustment or Net, but not all three.
  • Not configured. Denotes that, based on the current configuration, an Account Cell that must be configured hasn't been configured.
  • Configured twice. Denotes that an Account Cell has been configured at both a higher and lower level.
  • Unbalanced offsets. Denotes that a line is missing either the Account Cell or the Account Offset Cell.

Toolbar Icons

Icon Description

Save                              

Save the revenue lines you create/configure.

New

Create a new revenue line.

Delete

Delete a revenue line.

Move                                  

Move revenue lines from one revenue category to another.

Move Up/Move Down

Determine the order of the revenue lines.

Expand All/Collapse All

View all levels of revenue lines or just the top level lines.

Manual Entry Order

Determine the order that the revenue lines appear in the Manual tab. This allows you to match the order of the lines with the report from which you are working.

Revenue Day Validation

Link certain data entry lines to other lines and ensure that the values are the same before allowing the day to be posted.

Other Actions

Import Revenue Lines.
Import Revenue Cell Mapping.
Export Revenue Mapping.