Working with department mappings in STAFFScope Campaign Management
From the Department Mapping tab of STAFFScope Campaign Management you can group multiple sub-departments into a single job class. For departments that have low numbers of employees, mapping them to other job classes ensures that their anonymity is protected in surveys.
This page provides instructions for the following tasks:
Accessing the Department Mapping tab of STAFFScope Campaign Management
-
In the upper-left corner of the screen, select Access your applications (
 ).
).
The menu expands. -
Select Survey > STAFFScope Campaign Management.
The STAFFScope Campaign Management screen appears. Each time you open STAFFScope Campaign Management, a tutorial wizard appears. The tutorial offers an overview STAFFScope Campaign Management.Note: You can access this tutorial at any time by selecting the View Tutorial button in the upper-right corner of the screen.
-
Select the Department Mapping tab.
 Click here for field descriptions.
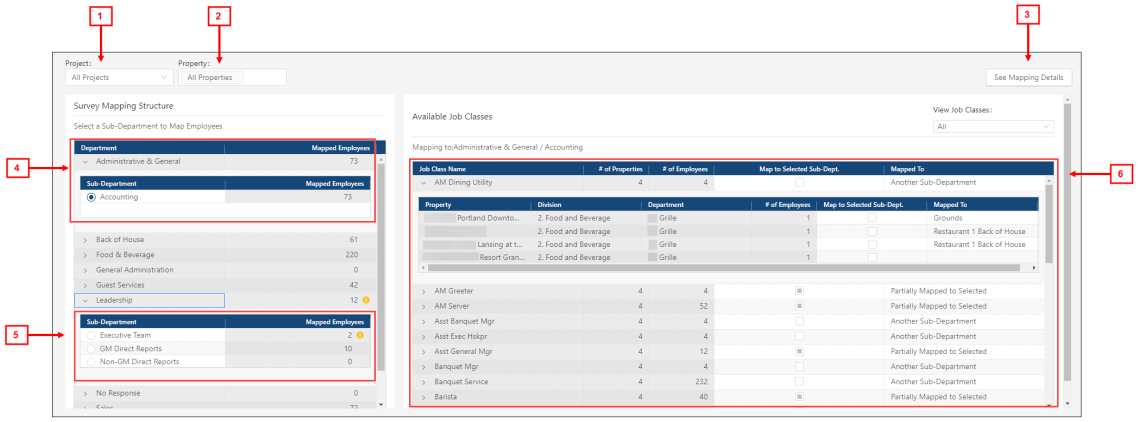
Fields on the Department Mapping tab of STAFFScope Campaign Management
# Field Description Notes 1
Project
Select the project for which to view mappings.
A survey project refers to the UnifocusSurvey Solutions product or modules with which the survey period is associated. Projects might include STAFFScope, MEETINGScope, GUESTScope, SERVICEScope, and so on. For example, a STAFFScope project is a unique project associated with the UnifocusSTAFFScope product.
2
Property
Select one or multiple properties to which the mapping is applied.
Default: All Properties.
3
See Mapping Details
Opens the Mapping Details dialog box in STAFFScope Campaign Management, which displays a tree menu of the mapping structure and lists the number of employees mapped to each department and sub-department.
Survey Mapping Structure 4
Departments and Sub-Departments
The table includes all departments and sub-departments that are imported from the RMS database.
-
Department—Organization level that includes jobs and sub-departments (work groups).
-
Sub-Department—Job or work group that is part of the department.
Departments and sub-departments are defined in the RMS database that is associated with the property.
Departments and sub-departments are sorted alphanumerically. The first sub-department is expanded by default.
5
Mapped Employees
Number of employees that are mapped to the department or sub-department.
If there are mapping issues with the department or sub-department, an icon (
 ) appears in the field. This alert applies to all selected properties/locations. For example, an icon appears if a sub-department has too few employees to meet the configured threshold for protecting anonymity in surveys. View the tooltip for more information.
If there are too few employees, you will not see survey data for the employees or sub-department in generated reports.
6
Available Job Classes This section lists all the available jobs (organized by sub-department) that are available to be mapped with the department or sub-department selected in the Survey Mapping Structure section.
Jobs that do not meet the threshold appear at the top of the section.
View Job Classes
Use this filter for selecting which jobs within the selected departments and sub-departments to view.
Jobs that do not meet the threshold criteria appear at the top of the list.
Mapping to:
Name of the RMS department to which the selected department is mapped.
Read-only.
Job Class Name
Name of the jobs in the selected department and sub-department.
# of Properties
Number of properties associated with the selected job class or property.
# of Employees
Number of employees in the selected job class or property.
Map to Selected Sub-Dept.
Select the check box to map the job to the selected sub-department.
Mapped To
Sub-department to which the selected job is mapped.
Read-only.
-
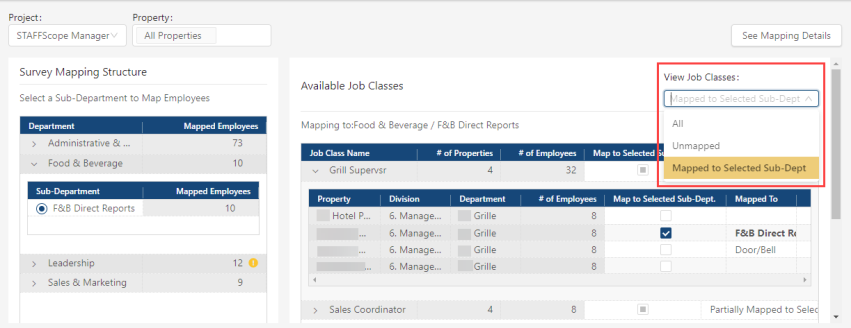
Filtering information on the screen
Using the View Job Class filter, you can view mappings based on the selected sub-departments in the Survey Mapping Structure section. This filter allows you to quickly see your sub-department mappings.
-
From the Project drop-down list, select the project for which to view department and sub-department mappings.
-
Select the Property field and from the resulting drop-down list select one or multiple properties.
-
In the Survey Mapping Structure section, expand (
 ) the Department and select the job in the Sub-Department for which to view mapping information.
 -
From the View Job Class drop-down list, select one of the following options:
-
All—Shows both mapped and unmapped job classes.
-
Unmapped—Show only job classes that are not mapped to the selected sub-department in the Survey Mapping Structure section.
-
Mapped to Selected Sub-Dept.—Show only job classes that are mapped to the selected sub-department in the Survey Mapping Structure section.
-
The screen updates based on your selection.
Mapping a sub-department
Mapping a sub-department allows you to group it into a larger job class to protect the anonymity of the employees in surveys. Although you can map any sub-department, your main objective is to map the sub-departments that contain few employees and do not meet the minimum configured threshold. In the Survey Mapping Structure section, icons ( ) indicate which departments and sub-departments have numbers of employees that do not meet the configured threshold. This alert applies to all selected properties/locations.
-
From the Project drop-down list, select the project for which to view department and sub-department information and mappings.
-
Select the Property field and from the resulting drop-down list select one or multiple properties with which to map sub-departments.
-
In the Survey Mapping Structure section, review the jobs in the Department and Sub-Department tables. If necessary, expand (
) the tree menus to see more departments and sub-departments. Icons ( ) indicate which departments and sub-departments have numbers of employees that do not meet the configured threshold.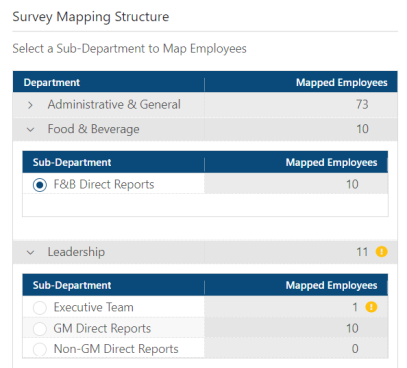
-
In the Survey Mapping Structure section, expand (
) the Department and select the job in the Sub-Department that you want to map. -
In the Available Job Classes section, expand (
) the Job Class Name rows to see the sub-departments for properties associated with the job class name. -
In the expanded table in the Available Job Classes section, select Map to Selected Sub-Dept to map the sub-department that you selected in the Survey Mapping Structure section.
Note: If the selected sub-department has already been mapped, the name of the mapped job class appears in the Mapped To field.
One of the following results occurs:
-
If you selected a sub-department that has already been mapped, a dialog box appears to inform you that the job class is mapped to a different sub-department. To confirm the new mapping, select Yes, update mapping.
-
If you selected a sub-department that has not yet been mapped, the name of the newly mapped sub-department appears in the Mapped To field. No further action is required.
-
Viewing mapping details
-
From the Project drop-down list, select the project for which to view department and sub-department mappings.
-
Select the Property field and from the resulting drop-down list select one or multiple properties.
-
Select SeeMapping Details.
The Mapping Details dialog box appears. It displays a tree menu of the mapping structure and lists the number of employees mapped to each department and sub-department.Click here for field descriptions.
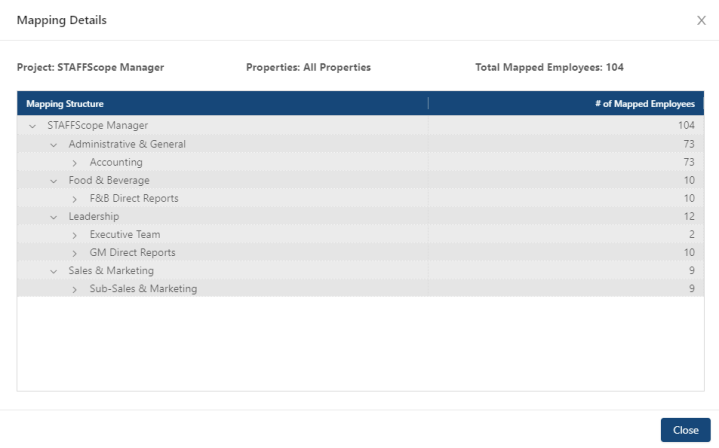
Fields on the Mapping Details dialog box
Field Description Notes Project
Name of the associated Survey Solutions project.
A survey project refers to the UnifocusSurvey Solutions product or modules with which the survey period is associated. Projects might include STAFFScope, MEETINGScope, GUESTScope, SERVICEScope, and so on. For example, a STAFFScope project is a unique project associated with the UnifocusSTAFFScope product.
Read-only.
Properties
Properties associated with the project.
Read-only.
Total Mapped Employees
Total number of mapped employees for the labor structure associated with the selected project.
Read-only.
Table Mapping Structure
Tree menu of all mapped employees in the labor structure associated with the selected project.
Read-only.
# of Mapped Employees
Number of mapped employees for each department and sub-department within the labor structure associated with the selected property.
Read-only.
-
When you are finished viewing mappings, select Close.
The dialog box closes.