Working with notifications in Housekeeping Dashboard
Notifications keep users and team members informed about important data, updates, and actions in the Housekeeping software.
This page describes the following procedures:
Scheduling a notification
-
From the main menu on the left side of the screen, select the Housekeeping (
 ) > Housekeeping Analytics.
The HOUSEKEEPING ANALYTICS screen opens to the Housekeeping Dashboard.
-
In the upper-right corner of the screen, select Notifications (
 ).
). -
From the resulting menu, select Scheduled.
The Set Up Notification pane appears. -
In the Name field, enter a title for the notification.
-
In the Description field, enter a brief description of the notification.
-
Do one of the following:
-
To ensure that the notification is sent immediately, select Run Immediately.
-
To schedule a notification, select Define schedule and complete the fields in the Schedule Rule pane as necessary. When you are finished configuring the schedule, select Save.
Fields on the Schedule Rule pane
Field Description Notes Enabled
Select to enable the rule.
Default: Selected.
Time Zone
Select the time zone to be associated with the rule.
Daylight Savings Time
Select to apply Daylight Savings Time to the rule.
Default: Cleared.
Start Date
Select the start date for the notification.
Default: Current date.
Repetition Pattern
Select whether the notification will be sent daily, weekly, or monthly.
Default: Daily.
Every Nth Day
Specify the frequency of the notification.
Default: 1.
Intra-Day Recurrence
Select if the notification will be sent multiple times per day.
Default: Cleared.
End Date
Select the end date of the notification.
Default: No end date.
-
-
In the Set Up Notification pane, select Add export content.
The Notification Content pane appears. -
Complete the fields as necessary to choose the content and format of the notification. When you are finished, select Save.
Fields on the Notification Content pane
Field Description Notes Export Format
Select one of the format options: CSV, Excel, Image, PDF, or PowerPoint.
Default: PDF.
Name
Enter a name for the exported content.
Default: Housekeeping Dashboard - Official.
Use Name For Filename
Select to use the name that appears in the Name field as the filename.
Default: Cleared.
Settings
Specify the paper size and orientation of the exported file.
Advanced
Specify units, width, height, and margins.
Click the section heading to expand Advanced. Append Date To File Name
Select to append the date to the filename.
Default: Cleared.
Preserve Current Parameter Values
Select to preserve your settings in the Housekeeping Dashboard.
Default: Selected.
-
In the Set Up Notification pane, select Delivery options.
The Delivery Options pane appears.Note: Delivery options will be disabled until you complete the fields in Add Export Content.
-
Complete the fields as necessary to define how the notification should be delivered. When you are finished, select Save.
Fields on the Delivery Options pane
Field Description Notes Delivery Method
Select the delivery method: Email or File.
Email—You can send the content to specified recipients via email, with customizable subject and body.
File—With file, the content is not sent via email but is stored as a file that can be accessed later or shared through other means.Default: Email.
-
If you select Email, enter the details for the email delivery method.
-
If you select File, enter the details for the file delivery method.
Email Recipient
List of selected recipients.
To edit a recipient, select the Edit recipient button.
To remove a recipient, select the Remove recipient button.
Add recipient
Select to open the Email Recipient pane.
Message subject
Enter the subject line of the message.
Click
 to add placeholder to the text. The placeholder will be replaced with the corresponding data when the email is sent.
Available options includes:-
Creation date
-
User name
-
View name
-
View link (0)
Message body
Enter the body of the message.
Click
to add placeholder to the text. The placeholder will be replaced with the corresponding data when the email is sent.
Available options includes:-
Creation date
-
User name
-
View name
-
View link (0)
Edit template in advanced editor
Select to open the Message Body editor where you can apply styles to your text.
Export Using Recipient Account
Select to use each recipient’s account to access the view and its data when exporting.
Default: Cleared.
Attachments
Select to add attachments to the notification.
Default: Selected.
File Folder Specify the folder where the file will be saved. Default: Cleared.
File Name Template Define the naming convention for the file. Default: Cleared.
File Lifespan (Hours) Enter the number of hours the file will remain available. Default: Cleared.
-
-
At the bottom of the Set Up Notification pane, select Save icon to finalize the notification setup.
Updating notifications
From the Notifications pane, you can perform various tasks for an existing notification:
-
Enable/Disable
-
Edit
-
Run
-
Delete
To update an existing notification:
-
From the main menu on the left side of the screen, select the Housekeeping (
) > Housekeeping Analytics.
The HOUSEKEEPING ANALYTICS screen opens to the Housekeeping Dashboard.
-
In the upper-right corner of the screen, select Notifications (
 ).
). -
From the resulting menu, select Edit your notification.
The Notifications pane appears. -
Select the checkbox of the notification that you want to update.
-
Update the notification as necessary. See the field descriptions below for details.
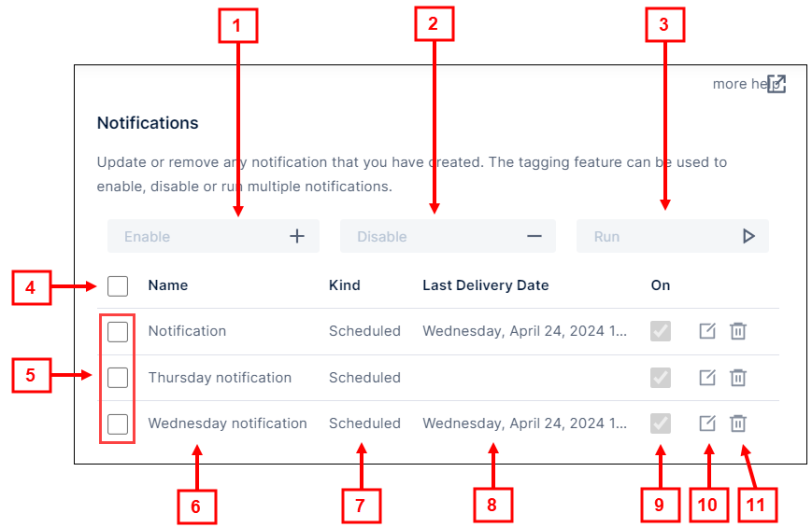
Fields on the Notifications pane
# Field Description Notes 1

Enable
Enable the selected notification.
You must first select a notification for this field to be available.
2

Disable
Disable the selected notification.
You must first select a notification for this field to be available.
3

Run
Run the selected notification.
You must first select a notification for this field to be available.
4

Select all
Select all notifications.
5

Select individual
Select an individual notification.
6
Name
Name of the notification.
Read-only.
You must select Edit your notification to edit this field.
7
Kind
Type of notification: Scheduled, Data Driven, Data Correction, or Note.
Currently, only the Scheduled type is supported.
Read-only.
8
Last Delivery Date
Date and time when the notification was last delivered.
Read-only.
9

On
If selected, the notification is enabled.
10

Edit your notification
Opens the Set Up Notification pane where you can edit details of the notification. For more information, see the field descriptions in Housekeeping Dashboard.
11

Delete your notification
Opens a dialog box to confirm that you want to delete the selected notification.