Working with shift requests (for managers)
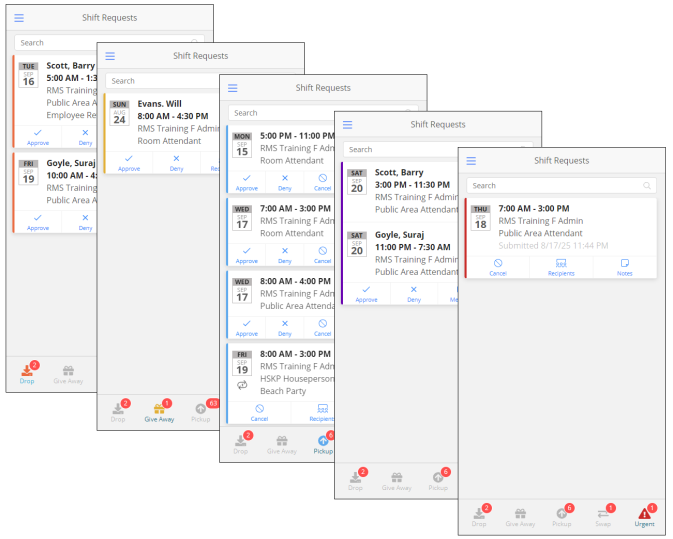
The Approve Shift Requests screen allows managers to review and take action on various types of employee shift requests, including drop, give away, pickup, swap, and urgent requests. From this screen, managers can approve or deny requests, view request recipients, cancel pickup or urgent shifts, and send urgent pickup requests to eligible employees. Grouped shift functionality streamlines actions on identical requests, enabling managers to respond to or cancel multiple requests at once. Additional features include access to shift notes and in-app messaging, making it easy to manage scheduling communication directly within the Mobile App.
Contents
Accessing the Approve Shift Requests screen
-
In the Mobile App, select the hamburger menu (
 ) to expand the main menu.
 -
Select Approve Shift Requests.
The Shift Request screen appears.
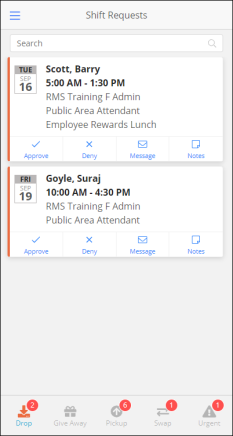
This screen features five tabs:
-
Drop (
 )
) -
Give Away (
 )
) -
Pickup (
 )
) -
Swap (
 )
) -
Urgent (
 )
)
-
Working with drop requests
A drop request (![]() ) is a request submitted by an employee to remove a scheduled shift from their work schedule, pending manager approval.
) is a request submitted by an employee to remove a scheduled shift from their work schedule, pending manager approval.
Approving a drop shift request
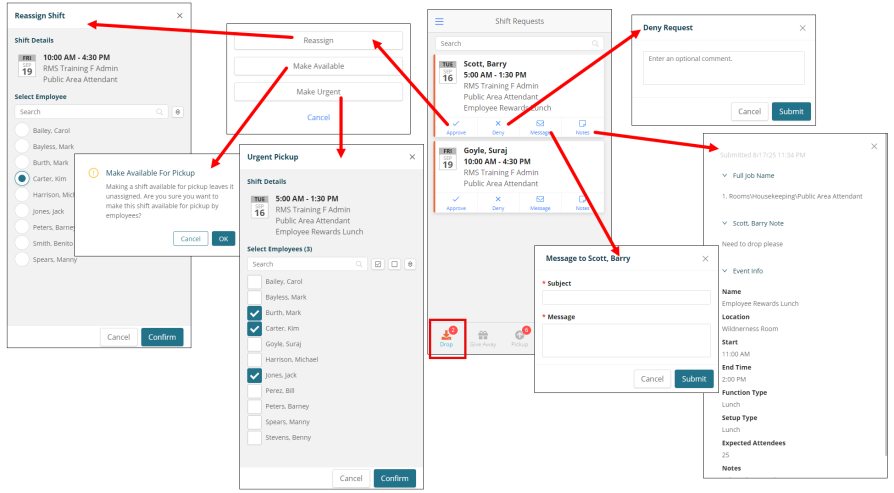
When you approve a drop request, you must do one of the following:
-
Reassign the shift to another employee.
-
Make the shift available for pickup by other employees.
-
Mark the shift for urgent pickup and send the shift to one or multiple employees for pickup.
To approve a drop shift request:
-
Select the Drop (
) tab. -
Find the request you want to approve. Search for the request or scroll through the list to locate it.
-
Select Approve (
 ).
). -
Choose one of the options:
-
Reassign
-
Select the employee to whom the shift will be reassigned.
-
Select Confirm.
-
-
Make Available
-
Select OK to confirm that you are making the shift available for pickup.
-
-
Make Urgent
-
Select one or more employees to receive the urgent request.
For more information about urgent requests, see Working with urgent requests. -
Select Confirm.
-
-
Denying a drop shift request
When you deny a drop request, the shift stays assigned to the employee who submitted the request.
-
Select the Drop (
) tab. -
Find the request you want to approve. Search for the request or scroll through the list to locate it.
-
Select Deny (
 ).
).
The Deny Request dialog box appears. -
(Optional) Enter a message to the employee.
-
Select Submit.
Messaging an employee
Messaging allows you to communicate directly with employees, enabling clarifications, timely updates, and more efficient shift coordination.
-
Select the Drop (
) tab. -
Find the request of the employee you want to message. Search for the request or scroll through the list to locate it.
-
Select Message (
 ).
).
The message pane opens. -
Enter the Subject and Message of your message.
-
Select Submit.
Viewing notes
Viewing notes added by an employee to their shift request provides context that can assist in making informed approval decisions and addressing any special considerations.
-
Select the Drop (
) tab. -
Find the request for the employee whose notes you want to view. Search for the request or scroll through the list to locate it.
-
Select Notes (
 ).
).
The notes pane opens. -
Expand the sections to view complete details.
-
When you are finished, select the X button to close the notes pane.
Working with give away requests
A give away request is a request submitted by an employee to offer their scheduled shift to other eligible employees, pending manager approval and acceptance by a recipient.
Approving a give away shift
Approve a give away shift to reassign it to one or multiple employees.
-
Select the Give Away (
) tab. -
Find the request you want to approve. Search for the request or scroll through the list to locate it.
-
Select Approve (
).
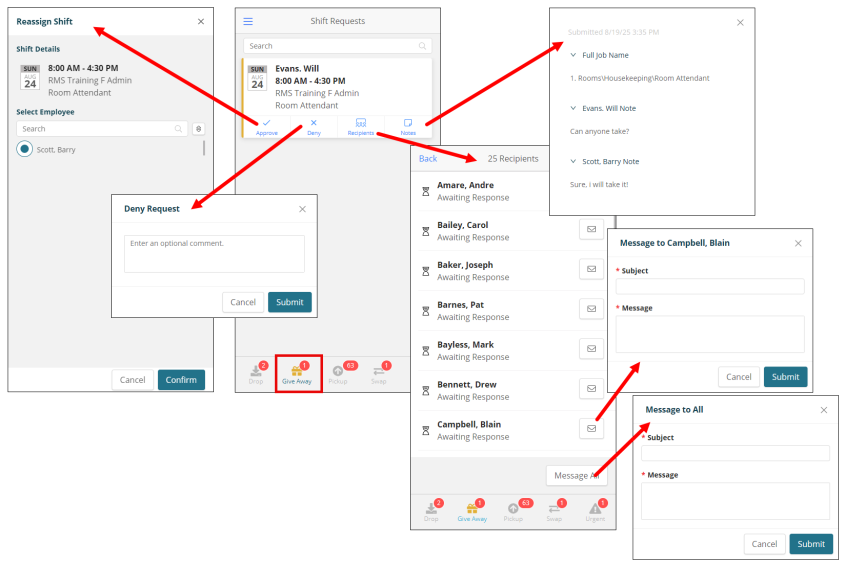
The Reassign Shift screen appears. -
Select the employee to whom you will reassign the shift.
-
Select Confirm.
Denying a give away shift
When you deny a give way request, the shift stays assigned to the employee who submitted the request.
-
Select the Give Away (
) tab. -
Find the request you want to deny. Search for the request or scroll through the list to locate it.
-
Select Deny (
).
The Deny Request dialog box appears. -
(Optional) Enter a comment to the employee.
-
Select Submit.
Viewing recipients of a give away shift
Viewing all recipients of a give away shift and messaging them individually or as a group enables targeted communication, helping you fill shifts more efficiently and reduce scheduling delays.
-
Select the Give Away (
) tab. -
Find the request for which to view recipients. Search for the request or scroll through the list to locate it.
-
Select Recipients (
 ).
).
The Recipients screen appears. It displays the number of recipients, the list of all recipients, the status of each recipient, and options to message one or all recipients. -
To message an individual:
-
Find the employee in the list and select the envelope icon (
 ).
).
The message dialog box appears. -
Enter the Subject and Message of your message.
-
Select Submit.
-
-
To message all recipients:
-
Select Message All.
The message dialog box appears. -
Enter the Subject and Message of your message.
-
Select Submit.
-
Viewing notes for a give away shift
Viewing notes added by an employee to their shift request provides context that can assist in making informed approval decisions and addressing any special considerations.
-
Select the Give Away (
) tab. -
Find the request for the employee whose notes you want to view. Search for the request or scroll through the list to locate it.
-
Select Notes (
).
The notes pane opens. -
Expand the sections to view complete details.
-
When you are finished, select the X button to close the notes pane.
Working with pickup requests
A pickup request is submitted by an employee who wants to work a shift originally assigned to another employee, subject to manager approval.
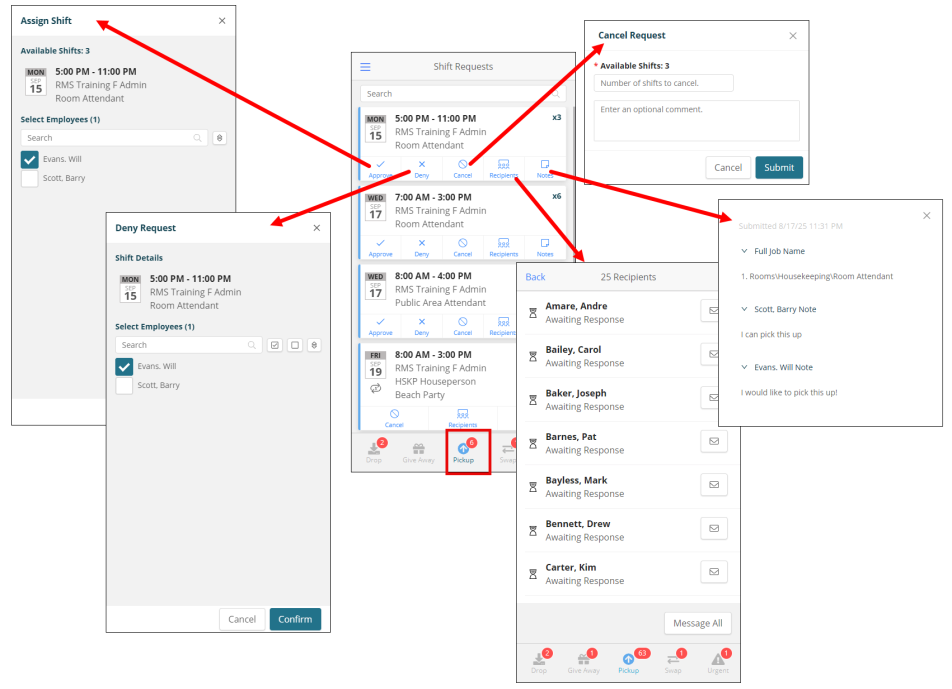
Note: The First Come First Serve icon (![]() ) indicates that the shift is first come first serve, that is, the shift pickup request does not require manager approval. Once accepted by the employee, the shift is automatically approved.
) indicates that the shift is first come first serve, that is, the shift pickup request does not require manager approval. Once accepted by the employee, the shift is automatically approved.
Approving a pickup request
Approve a pickup shift to assign it to one or multiple employees.
-
Select the Pickup (
) tab. -
Find the request you want to approve. Search for the request or scroll through the list to locate it.
-
Select Approve(
).
The Assign Shift dialog box appears. -
Select one or multiple employees.
-
Select Confirm.
Denying a pickup request
When you deny a pickup request, the shift stays assigned to the employee who submitted the request.
-
Select the Pickup (
) tab. -
Find the request you want to deny. Search for the request or scroll through the list to locate it.
-
Select Deny (
).
The Deny Request dialog box appears. -
Select one or multiple employees.
-
Select Confirm.
Canceling a pickup request
Canceling a shift request removes it from the schedule and notifies affected employees, if applicable.
-
Select the Pickup (
) tab. -
Find the request you want to cancel. Search for the request or scroll through the list to locate it.
-
Select Cancel (
 ).
).
The Cancel Request dialog box appears -
Enter the number of shifts to cancel.
-
(Optional) Enter a comment about the cancellation.
-
Select Submit.
Viewing recipients of a pickup request
Viewing all recipients of a pickup shift and messaging them individually or as a group enables targeted communication, helping you fill shifts more efficiently and reduce scheduling delays.
-
Select the Pickup (
) tab. -
Find the request whose recipients you want to view. Search for the request or scroll through the list to locate it.
-
Select Recipients (
).
The Recipients screen appears. It displays the number of recipients, the list of all recipients, the status of each recipient, and options to message one or all recipients. -
To message an individual:
-
Find the employee in the list and select the envelope icon (
).
The message dialog box appears. -
Enter the Subject and Message of your message.
-
Select Submit.
-
-
To message all recipients:
-
Select Message All.
The message dialog box appears. -
Enter the Subject and Message of your message.
-
Select Submit.
-
Viewing notes for a pickup request
Viewing notes added by an employee to their shift request provides context that can assist in making informed approval decisions and addressing any special considerations.
-
Select the Pickup (
) tab. -
Find the request for the employee whose notes you want to view. Search for the request or scroll through the list to locate it.
-
Select Notes (
).
The notes pane opens. -
Expand the sections to view complete details.
-
When you are finished, select the X button to close the notes pane.
Working with swap requests
A swap request is submitted by an employee to exchange their scheduled shift with another employee's shift, requiring approval from both the receiving employee and the manager.
Note: The Swap tab groups swapped shifts together and displays color codes for each shift type.
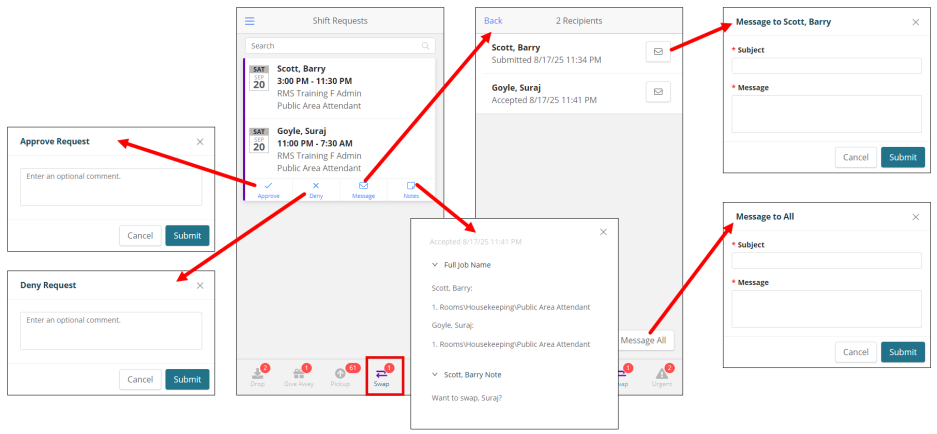
Approving a swap request
Approve a swap shift to assign it to the employee.
-
Select the Swap (
) tab. -
Find the request you want to approve. Search for the request or scroll through the list to locate it.
-
Select Approve (
).
The Approve Request dialog box appears. -
(Optional) Enter a comment.
-
Select Submit.
Denying a swap request
When you deny a swap request, the shift stays assigned to the employee who submitted the request.
-
Select the Swap (
) tab. -
Find the request you want to deny. Search for the request or scroll through the list to locate it.
-
Select Deny (
).
The Deny Request dialog box appears. -
(Optional) Enter a comment for the employee.
-
Select Submit.
Messaging employees
Messaging allows you to communicate directly with employees, enabling clarifications, timely updates, and more efficient shift coordination.
-
Select the Swap (
) tab. -
Find the request of the employee(s) you want to message. Search for the request or scroll through the list to locate it.
-
To message an individual:
-
Find the employee in the list and select the envelope icon (
).
The message dialog box appears. -
Enter the Subject and Message of your message.
-
Select Submit.
-
-
To message all recipients:
-
Select Message All.
The message dialog box appears. -
Enter the Subject and Message of your message.
-
Select Submit.
-
Viewing notes for a swap request
Viewing notes added by an employee to their shift request provides context that can assist in making informed approval decisions and addressing any special considerations.
-
Select the Pickup (
) tab. -
Find the request for the employee whose notes you want to view. Search for the request or scroll through the list to locate it.
-
Select Notes (
).
The notes pane opens. -
Expand the sections to view complete details.
-
When you are finished, select the X button to close the notes pane.
Working with urgent requests
An urgent request is created by a manager to quickly fill an open shift—typically resulting from an approved drop or call-in—by offering it to eligible employees for immediate pickup. The Urgent tab displays requests from the manager that are pending for employees to either accept or deny.
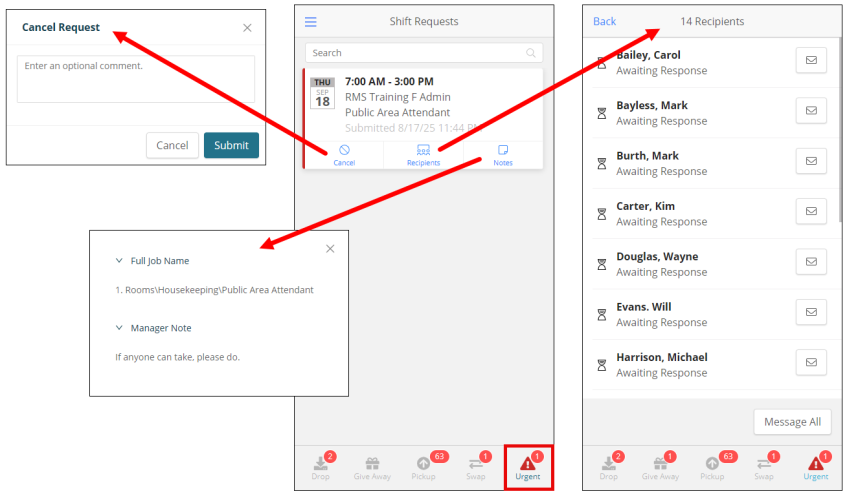
Canceling an urgent request
Canceling a shift request removes it from the schedule and notifies affected employees, if applicable.
-
Select the Urgent (
) tab. -
Find the request you want to cancel. Search for the request or scroll through the list to locate it.
-
Select Cancel (
).
The Cancel Request dialog box appears -
(Optional) Enter a comment about the cancellation.
-
Select Submit.
Viewing recipients of an urgent request
Viewing all recipients of a request and messaging them individually or as a group enables targeted communication, helping you fill shifts more efficiently and reduce scheduling delays.
-
Select the Urgent (
) tab. -
Find the request whose recipients you want to view. Search for the request or scroll through the list to locate it.
-
Select Recipients (
).
The Recipients screen appears. It displays the number of recipients, the list of all recipients, the status of each recipient, and options to message one or all recipients. -
To message an individual:
-
Find the employee in the list and select the envelope icon (
).
The message dialog box appears. -
Enter the Subject and Message of your message.
-
Select Submit.
-
-
To message all recipients:
-
Select Message All.
The message dialog box appears. -
Enter the Subject and Message of your message.
-
Select Submit.
-
Viewing notes for an urgent request
Viewing notes added by an employee to their shift request provides context that can assist in making informed approval decisions and addressing any special considerations.
-
Select the Urgent (
) tab. -
Find the request for the employee whose notes you want to view. Search for the request or scroll through the list to locate it.
-
Select Notes (
).
The notes pane opens. -
Expand the sections to view complete details.
-
When you are finished, select the X button to close the notes pane.