Adding a time off request in Employee Time Off Requests
Note: One you add a request, you cannot delete it. However, you can change its status to Canceled.
- In the upper-left corner of the screen, select Access your applications (
 ).
).
The menu expands. -
Select Labor > Time Off Requests.
The Time Off Requests screen appears with the Select jobs dialog box open.
-
Select + Add Request.
The Select Employee dialog box appears. -
Select an employee.
-
Select Select.
The Time Off Request pane opens. The Start Date and End Date fields are populated with the current date. Click here for field descriptions.
Fields for the Time Off Request pane
Field Description Notes Employee
Name of the employee.
Time Off Type
The type of requested time off.
The available time off types are configured in Setup.
Accrual Type table
This table display accrual type information for the employee.
Columns that appear in standard configuration:
-
Accrual Type—Accrual type that is configured for the employee.
-
Before— Accrued hours prior to this request.
-
After— Remaining hours after the request is taken.
Rows are configurable for desired time off types.
The columns and rows that appear depend on your system configuration. They are configured in Setup.
Distribute Hours
Opens the Distribute Hours Per Day dialog box.
For more information, see Distribute Hours Per Day dialog box in Employee Schedules
Request Status
Change the status of the time off type:
-
Pending
-
Denied
-
Approved
-
Canceled
Start Date / End Date
Enter the start and end dates of the time off request.
All-day request
Select whether the time off request is for the entire day or for part of the day.
Default: All-day request is selected.
Request Time
Enter the start and end times of the request.
These fields appear only if All-day request is switched off.
Paid Time
Amount of time for paid time off.
Paid time is configurable in days, hours, and minutes.
Manager Comment
Custom text entered by the manager.
Employee Comment
Custom text entered by the employee who submitted the request.
If submitted by an employee via the Mobile App, then this field is populated with the employee's comment.
Audit history
Record of what changes were made and who entered the changes.
Read-only.
Cancel
Close the Time Off Request pane without submitting your changes.
Submit Request
Submit the time off request.
Note: If you are not adding a time off request for the first day of the selected planning period, you should first update the Start Date and End Date display the desired date before continuing to the next steps.
-
-
In the Time Off Type field, select a time off type from the drop-down menu.
-
If you need to distribute hours for the time off request, do the following:
-
Select Distribute Hours.
The Distribute Hours Per Day dialog box appears.Click here for field descriptions.
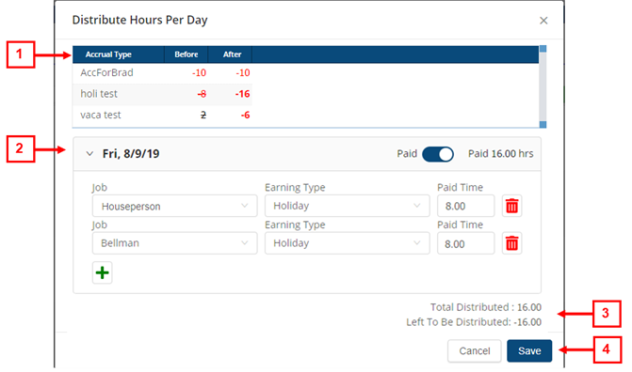
Fields for the Distribute Hours Per Day dialog box
# Field Description Notes 1
Accrual Type table The table displays configured accrual balances for the employee. Accrual Type
Configured accrual type for the employee.
Read-only.
Before
Accrual balance before time off is entered.
Read-only.
After
Accrual balance after time off is entered.
This number updates as you enter Paid Time.
Read-only.
2
Distribution details The section contains a row for each distribution.
Paid /Unpaid
Select whether to distribute requested time off to paid earnings.
If not selected, it will not create an earning.
Job
From the drop-down list, select another job for the hours distribution.
Earning Type
From the drop-down list, select another earning type to apply.
Paid Time
Enter the number of hours to be distributed to this job and earning type.

Delete
Delete the distribution.

Add distribution
Creates a new row to add another distribution.
3
Distribution hours Total Distributed
Total number of hours distributed based on the paid hours requested.
Read-only.
Left To Be Distributed
Number of remaining hours that need to be distributed.
Read-only.
4 Buttons Cancel
Closes the dialog box without applying your changes.
Save
Applies your changes and closes the dialog box.
-
Toggle the switch to Paid.
The section for the selected date expands. -
From the Job drop-down list, select a job for the distribution.
-
From the Earning Type drop-down list, select the earning type for the distribution.
-
In the Paid Time field, type the hours of paid time to be distributed.
-
To add another distribution, select the add new distribution button (
) and repeat steps c through e. -
Select Save.
The distribution is saved.
-
-
If necessary, select a different Request Status option.
-
If you are submitting a partial-day time off request, do the following:
-
Select the All-day request switch.
The section expands. -
Enter the partial-day request start and end times.
-
-
In the Paid Time field, type the number of hours for the time off request.
-
(Optional) In the Manager Comment text box, type your comment about the request.
-
(Optional) In the Employee Comment text box, type the comment from the employee requesting time off.
-
Select Submit Request.
The request is submitted, and a time off request bar appears in the schedule pane.
The employee is notified of the new request via the Unifocus Mobile App.