Generating schedules
Use the Generate Schedules task to start auto-scheduling employees into planned shifts. By default, all employee types and jobs will be scheduled.
Note: Schedule Change Validation work rules are applied automatically when schedules are generated.
-
In the upper-left corner of the screen, select Access your applications (
 ).
).
The menu expands. -
Select Labor> Planning.
The Planning screen appears.
-
Find and run the Generate Schedule task in the Planning menu.
 Working with each view in the Planning menu
If you are using Quick View:
-
Find the task to update or run by moving through the task sub-screens:
-
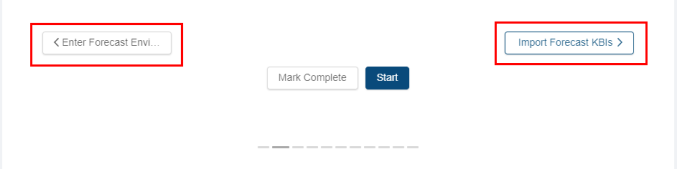
Select previous or next task buttons.
or -
Select the dashed lines of the screen selector.

-
-
When you get to the task, do one of the following:
-
To start or run the task for the first time, select Start.
The selected task opens in either separate tab or in a pane, depending on the task. -
To update the task (if it has already been started), select Update.
-
If you are using List View:
-
Find the task to update, run, or mark complete by scrolling down the screen.
-
When you get to the task, hover the mouse pointer over the status label.
A drop-down list appears.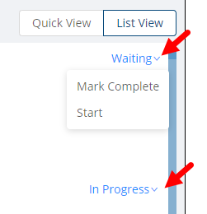
-
From the drop-down list, select one of the following:
-
To start or run the task for the first time, select Start.
The selected task opens in either separate tab or in a pane, depending on the task. -
To update the task (if it has already been started), select Update.
The selected task opens in either separate tab or in a pane, depending on the task.
-
The Generate Schedules dialog box opens.
-
-
Complete the fields as necessary.
Click here for field descriptions.
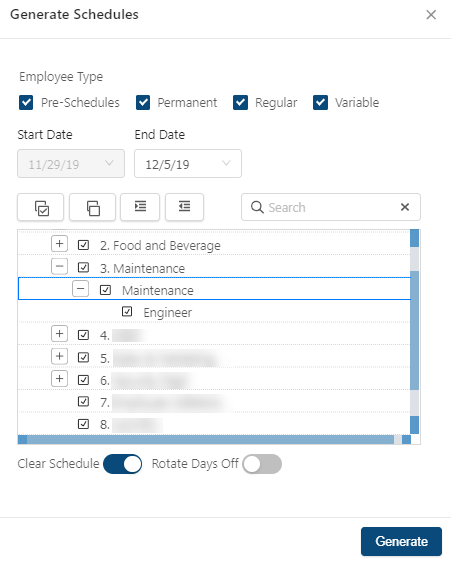
Fields on the Generate Schedules dialog box
Field Description Notes Employee Type
Specifies the type of schedules to generate. Options include:
-
Pre-schedules—Employees with pre-schedules entered.
-
Permanent—Employees with permanent schedules.
-
Regular—Employees with regular schedules.
-
Variable—Employees with variable schedules.
Default: All options selected.
You can select one or multiple options.
Start Date
Start date of the time frame for which to generate schedules.
This date is the first day of the current planning period and cannot be changed.
Read-only.
End Date
End date of the time frame for which to generate schedules.
Default: Last day of the current planning period.
Select jobs section
Jobs to include in the schedule.
If necessary, use the following controls to find shifts:
-
Select All (
 )—Selects the check boxes for all organization levels in the tree menu.
 -
Deselect All (
 )—Clears the check boxes for all organization levels in the tree menu.
 -
Expand All (
 )—Expands the tree menu to display all organization levels.
 -
Collapse All (
 )—Collapses the tree menu to display only top organization levels.
 -
Search (
 )—Search field for entering the name of job or organization level, and tree menu updates to match your entry.
You can select one or multiple options.
Clear Schedule
-
On (
 )—Schedules for the selected jobs are be cleared for the chosen date range before schedules are populated.
 -
Off (
 )—Only existing unscheduled planned shifts are scheduled.
Default: On—schedules will be cleared.
Schedule Change Validation work rules are applied automatically when schedules are cleared as part of the Generate Schedules process.
Rotate Days Off
-
On (
 )—For jobs with day-off rotation plans configured, plans will be used as part of the autoschedule routine.
 -
Off (
 )—No day-off rotation plans will be used.
Default: Off.
Generate
Generates the schedule and closes the dialog box.
This button becomes available for selection only after you have selected jobs.
-
-
Select Generate.
The auto-schedule is generated.
When the process is complete, a message appears with a link to retrieve the file. If the file is a “zipped” (compressed) folder, you will need to unzip the folder to extract the individual files before moving them to their destination folder. You can also retrieve the file from the My Processes screen. For more information, see My Processes.