Scheduling a recurring job
When you register a job in Service, you have the option to create a recurrence schedule for the job. Service uses this schedule to automatically create and assign jobs that occur at regular intervals.
For example, HVAC filters might need to be replaced once every three months. You can create a recurring job to ensure that the maintenance crew attends to this task at exact three month intervals.
To schedule a recurring job, begin by Registering a job on the New job screen.
Tip: For all drop-down lists, begin by typing your search criteria in the field. The list is automatically filtered to match your entry.
- From the main menu, select Service (
 ) > New Job.
The New job screen appears.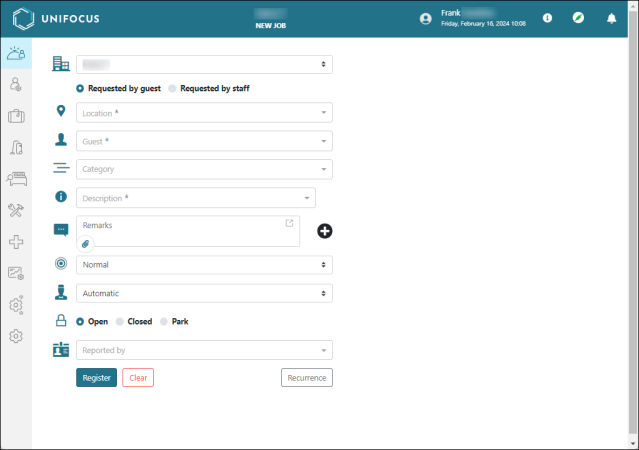
-
From the Select Property (
 ) drop-down list, select the property where the job will be performed.
Note: This option is available only if you have access to multiple properties.
-
From the Source options, select either Requested by guest or Requested by staff.
-
From the Location (
 ) drop-down list, select the name or number of the room where the job will be performed.
The Location history tab opens on the right side of the screen. -
From the Guest (
 ) drop-down list, select the name of the guest who requested the job.
The Guest details tab opens on the right side of the screen.Note: This option is available only if you selected Requested by guest.
-
From the Category (
 ) drop-down list, select the general descriptor that best fits the job.
The category determines which employees can be assigned to the job and filters the Description options. -
From the Description (
 ) drop-down list, select the description that best matches the job to be performed.
 -
(Optional) If the guest commonly requests this type of service, select Add preference (
 ) to save the job as a guest preference.
Note: This option is available only if you selected Requested by guest.
-
(Optional) In the Remarks field, enter any relevant information that was not captured by previous fields.
Tip: To expand the text box, select the pop-out icon (
 ). This will give you more room to type.
 -
(Optional) To attach images or documents, do the following:
-
Select Add Attachment (
 ).
).
The Attachments dialog box appears. -
Select Upload file.
In the resulting file explorer window, select the file that you want to attach.
The file is uploaded. -
Repeat step b until you have added all relevant files.
-
When you are done, select OK to close the Attachments dialog box.
-
-
From the Urgency drop-down list, select the degree of priority to be applied the job. Options include:
-
Normal—Not critical.
-
Urgent—Critical.
-
Xtra Urgent—Of extreme importance.
-
-
From the Assign (
 ) drop-down list, choose whether the job should be assigned automatically by the software or if you want to manually assign an employee to the task.
 -
From the Status options, select whether you want to register the job as Open, register the job as Closed, or Park the job.
-
From the Reported by (
 ) drop-down list, select the name of the employee who reported the job.
 -
When you have finished entering information on this screen, select Recurrence.
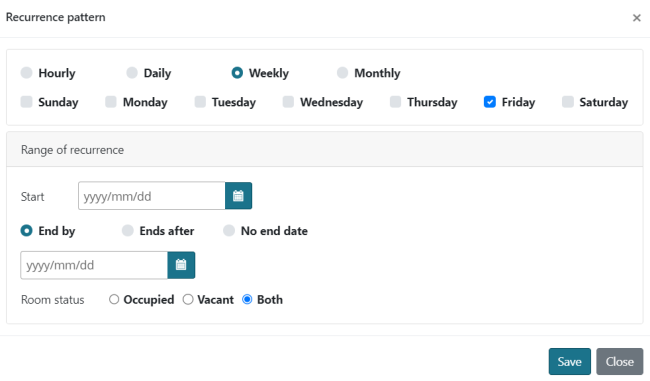
The Recurrence pattern dialog box appears. -
Set the recurrence pattern.
-
Schedule the frequency of the job.
 Click here for field descriptions.
If the job recurs... then select... After a certain number of hours Hourly.
In the Recurs every ... Hour(s) field, enter the number of hours that pass between each occurrence
After a certain number of days Daily.
In the Recurs every ... Day(s) field, enter the number of days that pass between each occurrence.
On certain days of the week Weekly.
Select the days of the week on which the task is performed.
On certain days of the month Monthly.
Select the checkbox(es) for the day(s) of the month on which the task is performed, and then enter the number of months that pass between each occurrence in the Recurs every ... Month(s) field.
-
In the Start field, enter the date or use the calendar menu to select the date of the first occurrence.
-
Schedule the end date.
Click here for field descriptions.
If the job ends... then select... On a specified date End by.
Enter the date or use the calendar menu to select the date of the final occurrence.
After a certain number of occurrences Ends after.
Enter the number of occurrences to be completed in the ... Occurrence(s) field.
After the guest checks out Upon Check-out.
Note: This option is only available if the location is an occupied room.
Until the recurring job is manually deleted No end date.
-
Use the Room status field to schedule the job only if the room is Occupied, Vacant, or Both.
-
Select Save.
The job is registered, and the recurrence schedule is saved.
-