Working with the Employee Productivity screen
Use the Employee Productivity screen to view productivity goals and report the actual units serviced each day by employees in jobs that track employee-level productivity. You can also override productivity goals for employees on specific days. This information is used to calculate labor productivity at the employee level on the Employee Productivity Report.
-
In the upper-left corner of the screen, select Access your applications (
 ).
).
The menu expands. -
Select Labor > Actuals.
The Labor Actuals screen appears.
-
Find and run the Enter Employee Productivity task in the Actuals menu.
Note: If there has been a change in the configuration for employee productivity in Labor Structure, a dialog box appears and lists the configuration changes. You can either use the new configuration or revert to the original configuration.
Working with tasks for Labor Actuals
The screen opens at the top of the task list.
-
Find the task to update, run, or mark complete by scrolling down the screen.
-
When you get to the task, hover the mouse pointer over the status label.
A drop-down list appears.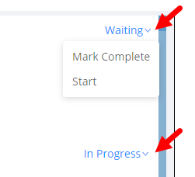
-
From the drop-down list, select one of the following:
-
To start or run the task for the first time, select Start.
The selected task opens in either separate tab or in a pane, depending on the task. -
To update the task (if it has already been started), select Update.
The selected task opens in either separate tab or in a pane, depending on the task. -
To mark the task as complete, select Mark Complete.
The task is marked complete.
-
* Personally identifiable information has been obscured or altered in the above image.
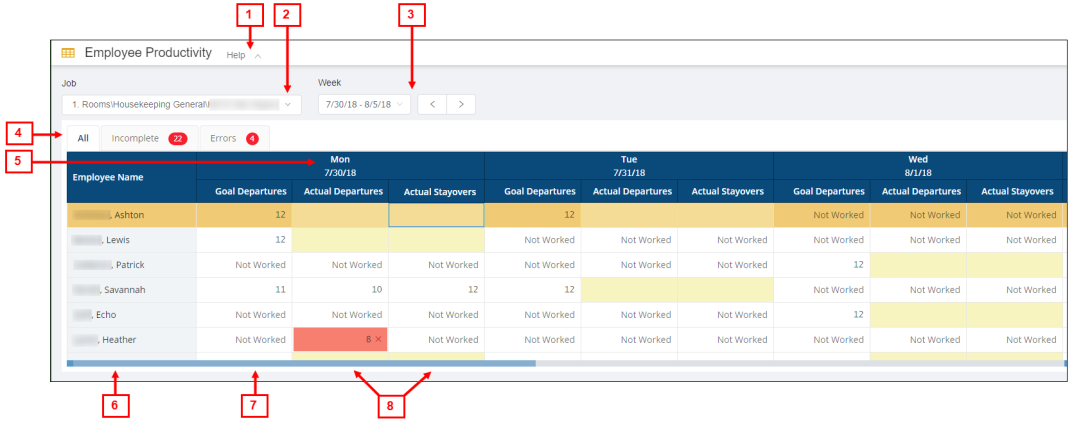
The column headings depend on the configured KBIs. For each day, there will never be more than three columns, and in cases where only one KBI is tracked, you will see only two columns. For example, if you are using dual KBIs of departures and stayovers—which is a common configuration—there will be three columns: Goal Departures, Actual Departures, and Actual Stayovers.
Fields on the Employee Productivity screen
| # | Field | Description | Notes |
|---|---|---|---|
| Controls |
|
||
|
1 |
Help |
Expands and collapses descriptive text about the Employee Productivity screen. |
|
|
2 |
Job |
Select the job. The screen displays all employees with productive worked hours in the selected job, for the selected week. The drop-down list includes only jobs that track employee-level productivity. |
|
|
3 |
Week |
The workweek for which data is displayed. To change the display week, select the field and select a week from the drop-down menu, or use the arrow buttons.
|
Default: Current calendar week. |
|
4 |
Tabs |
Filter options include:
|
Default: The Employee Productivity screen opens with the All tab selected. |
| Table |
|
|
|
|
5 |
Day of the Week |
Day of the week—Day and date. |
Read-only. |
|
6 |
Employee Name |
Name of the employee. Each employee has a job that tracks employee-level productivity. |
Read-only. |
|
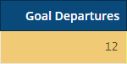
7 |
Goal |
Numerical value of goal units to be serviced. Goal values represent units per shift. For example, if the you are tracking rooms serviced for departures at a hotel, the cell might be populated with 16, indicating that 16 departure rooms is the goal for a full shift. |
The column heading depends on the KBI configured in the Labor Structure. Example: Goal Departures. Goals are automatically populated based on the configured KBIs. This field is only available for editing if goals are configured to allow overrides. |
|
8 |
Actual |
Numerical value of the actual units serviced. Actual values represent units serviced for the day. For example, if the you are tracking rooms serviced for departures, you enter the value of the actual number of departure rooms that the room attendant cleaned. The following color codes indicate the statuses:
See Working with the Employee Productivity screen for information on entering data, overriding goals, and correcting errors. |
The column heading depends on the KBI configured in the Labor Structure. Examples: Actual Departures, Actual Stay-overs. |
 —A white, blank cell indicates an incomplete entry for the current day, that is, the employee has worked hours today, but there are no reported units.
  — A yellow cell indicates an incomplete entry for a past day, that is, the employee has worked hours on a past day, but there were no reported units. For example, if an Actual Rooms cell for a past day is yellow, it indicates that the employee worked that day, but their actual units serviced have not yet been recorded.
 — A white cell with the text Not Worked indicates that the employee does not have productive worked hours for the day.
 — A red cell indicates an error, that is, units were reported for the employee, but there are no worked hours for the day. For example, if an Actual Rooms cell (for a past date) is red with an entry of 6, it indicates that the employee had worked hours on the date and a user had entered 6 to indicate that the employee cleaned 6 rooms. However, since that date, the worked hours for that employee have been deleted from the system. The red cell indicates that units were reported for an employee, but they no longer have any worked hours for the day.
On the Employee Productivity screen, you can perform the following tasks:
Selecting the job and week
-
From the Job drop-down list, select the job to display.
The table updates to display only employees who work the selected job. -
In the Week control section, either select the week from the drop-down list or select the arrows to move backward (
 ) or forward (
  ) one week.
The table updates to display information for the selected week.
Filtering the screen
There are three tabs on the Employee Productivity screen:
-
All—Selecting this tab displays all employees in jobs that track employee-level productivity.
-
Incomplete—Selecting this tab displays all employees (in jobs that track employee-level productivity) with incomplete schedules.
-
Errors—Selecting this tab displays all employees (in jobs that track employee-level productivity) with errors.
Entering actuals for employees
The primary task that you perform in the Employee Productivity screen is entering the actual units serviced by employees for each day they have worked hours. A white, blank cell indicates an incomplete entry for the current day, that is, the employee has worked hours today, but there are no reported units.

To enter actuals:
-
Select the job and week.
-
Filter the screen as necessary.
-
Select a cell and enter the numerical value for the employee.
Your entry is saved automatically. -
Repeat step 3 for each employee, as needed.
Updating incomplete entries
A yellow cell indicates an incomplete entry for a past day, that is, the employee has worked hours on a past day, but there were no reported units. For example, if an Actual Rooms cell for a past day is yellow, it indicates that the employee worked that day, but their actual units serviced have not yet been recorded.

To update incomplete entries:
-
Select the job and week.
-
Identify the incomplete entries by either looking for yellow-shaded cells or by selecting the Incomplete tab to see only employees with incomplete entries.
-
In the yellow cells, enter the numerical value for the day.
Your entries are saved automatically.
Correcting errors
A red cell indicates an error, that is, units were reported for the employee, but there are no worked hours for the day. For example, if an Actual Rooms cell (for a past date) is red with an entry of 6, it indicates that the employee had worked hours on the date and a user had entered 6 to indicate that the employee cleaned 6 rooms. However, since that date, the worked hours for that employee have been deleted from the system. The red indicates that units were reported for an employee, but they no longer have any worked hours for the day.

Although uncommon, you might have to correct errors on the Employee Productivity screen. To correct errors:
-
Select the job and week.
-
Identify the errors by either looking for red-shaded cells or by selecting the Errors tab to see only employees with errors.
-
Do one of the following:
-
To remove reported units, select the x in the corner of the cell.
The reported units are removed.
or -
To enter the employee's worked hours, go to the employee's Time Card and enter the worked hours.
For more information, see Review Time Card screen.
Your entries are saved automatically.
-
Overriding goals
Goals are configured in the Labor Structure and appear on the screen only if your installation of Employee Productivity is configured to allow overrides.
Note: If a productivity goal cannot be overridden, the Goal field will not appear on the screen.
Although goals are typically modified in the Labor Structure, in the rare cases where you need to update, you can do so directly on the screen. For example, if you are a housekeeping manager, you might want to override the goal for a room attendant on a day when their assignments include rooms with guests that make the goal unachievable.
To override a goal for an employee:
-
Select the job and week.
-
Filter the screen as necessary.
-
Identify the goals you want to edit, select the cell, and type the new numerical value.
Your entry is saved automatically.