Adding a new employee
Add a new employee to Employee Maintenance using the Add New (Employee) wizard. The Add New wizard guides you through information corresponding to the tabs on the Employee Maintenance screen. After you add an employee, you can use the tabs to edit or add more information.
Caution:If your company's employee records are updated by interfaces, you should add new employees in your company's system of record. Any changes you make using the New Employee wizard will be overwritten the next time an interface file is imported.
-
In the upper-left corner of the screen, select Access your applications (
 ).
).
The menu expands. -
Select Administration > Employee Maintenance.
The Employee Maintenance screen appears in a new tab.
-
In the upper-right corner, select Add New (
 ).
).
The wizard appears. -
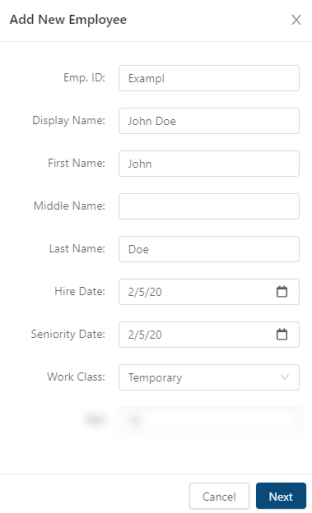
Enter the employee's general information.
Select the fields to see whether to type the information or select an option from a drop-down menu. Click here for field descriptions.

Fields on the Add New dialog box of the Add New wizard
Field Description Notes Emp. ID
Unique identification number for the employee.
Required. Display Name
Name that appears on the RMS screens.
For example, an employee might be commonly known by their middle and last name. If only the first and last names appear in Employee Maintenance, users might not recognize the employee. Change the display name to reflect the actual name used by the employee.
Required. First Name
First name of the employee.
Required. Middle Name
Middle name of the employee.
Last Name
Last name of the employee.
Required. Hire Date
Date when the employee was hired or began work.
Required. Seniority Date
Date when the employee's seniority is calculated.
Although this date is usually the same as the hire date, there are instances when the seniority date might differ from the hire date. For example, if an employee is initially hired, leaves the company, and is later rehired by the same company, their seniority date might be the date of the initial hire and their hire date might change to the rehire date.
Required. Work Class
Whether the employee is full time, part time, seasonal, temporary, or on call.
Cancel
Closes the dialog box without applying your changes.
Next
Applies your changes and opens the Add Job dialog box.
-
Select Next.
The Add Job screen appears. -
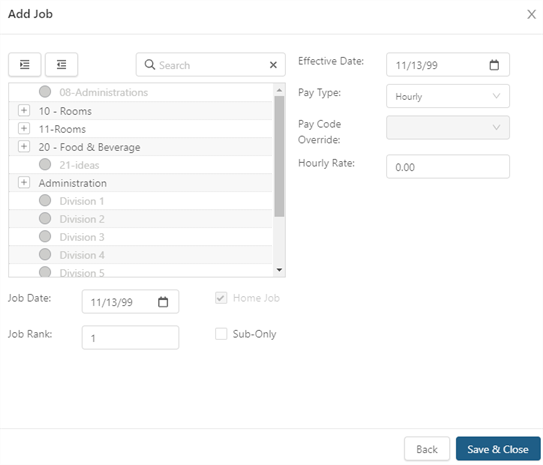
Enter the employee's job information.
Select the fields to see whether to type the information or select an option from a drop-down menu. Click here for field descriptions.

Fields on the Add Job dialog box of Add New wizard
Fields Description Notes Labor structure
Tree menu and check boxes for all organization layers (divisions, departments, and jobs) at the property.
Required. Search
In the Search field, type the text you want to search for.
Job Date
Seniority date for the job.
Job Rank
Skill level of the employee in the job you selected.
Home Job
Select the check box if this job is the primary position for the employee.
Sub-Only
Select the check box if you do not want the system to auto-schedule for the job role.
Effective Date
Date on which the job becomes active.
Pay Type
Whether the employee is paid as an Hourly, Piece, Salaried Exempt, Salaried Non Exempt, or Contract employee.
Pay Code Override
Numeric code of the pay code that overrides the default pay code that was established when configuring Time & Attendance Codes in Setup.
Hourly Rate
Hourly wage for an employee (including employees who are salaried).
Back
Returns to the previous page of the dialog box.
Save & Close
Applies your changes and closes the dialog box.
Save & Close is only enabled once a job is selected.
-
Select Save & Close.
The wizard closes and the employee is created.
Note: Additional required fields may be specified in Employee Config Field Overrides.