Adding an hours and rate adjustment
Part of your budgeting might include the need to adjust your system-generated hours for one or many jobs. Hours adjustments are typically used to reduce hours for reasons such as vacation, holiday, or attrition. However, there are times when you might want to add hours because there is a certain level of uncertainty in the accuracy of the long-term forecast. You use rate adjustments to change the rate of pay that is being applied during a day or date range. The most common reasons for these adjustments are to apply a departmental pay raise or to account for days when additional premiums apply due to special circumstances.
Use the Add New Adjustment wizard to add an hours and rates adjustment to a job.
Note: There is also an option to batch-import hours and rates adjustments using a CSV file. For more information, see Importing hours and rate adjustments.
-
In the upper-left corner of the screen, select Access your applications (
 ).
).
The menu expands. -
Select Financial > Budgeting.
The Budgeting Dashboard screen appears.
-
In the Budgeting menu pane, select Adjust Hours and Rates (
 ).
).
The Adjust Hours and Rates screen appears.
-
In the Add Adjustments section, select one of the adjustment types:
-
Rates
-
Hours
-
OT Hours
-
-
From the drop-down list, select one of the following:
-
Fixed Value—Select if the value is a dollar amount.
-
% Adjustment—Select if the value is a percentage adjustment.
The Add New Hours Adjustment Wizard appears. Click here for field descriptions.
Fields on the Add New Rates/Hours/OT Hours Adjustment wizard
Note: Fields are the same for all three types of adjustments, for both Fixed Value and % Adjustment.
Field Description Notes Screen 1 Description / Title of Adjustment
Enter a title or description of the adjustment.
Required.
Note
Enter a custom note about the adjustment.
Time Frame
Select one of the following time frame options:
-
Period—Add adjustments based on starting and ending periods.
-
Specific Dates—Add adjustments based on starting and ending dates.
Default: Period.
Starting Period
Starting financial period of the time frame for which the adjustment is applied.
This field appears only if Period is selected as the Time Frame.
Default: Period 1.
Ending Period
Ending financial period of the time frame for which the adjustment is applied.
This field appears only if Period is selected as the Time Frame.
Default: Period 12 (or the last period configured for your fiscal year).
Start Date
Starting date of the time frame for which the adjustment is applied.
This field appears only if Specific Dates is selected as the Time Frame.
Default: January 1 (first day) of the calendar year.
End Date
End date of the time frame for which the adjustment is applied.
This field appears only if Specific Dates is selected as the Time Frame.
Default: December 31 (last day) of the calendar year.
Cancel
Closes the dialog box without applying your changes.
Next
Takes you to the next screen in the wizard.
This button is available only if you have completed the required fields.
Screen 2 
Edit Job Selection
Opens the Select Jobs or Op Codes dialog box from which you add or remove Job Classes or Job Codes that appear in the Job Class table.
Default: Division, Department, and list of jobs that first displayed when you entered Adjust Hours and Rates. You can change division, department, and Op Code selection. For more information, see Operating Codes.
Description
Your description (from screen 1) of this adjustment.
Read-only.
Time Frame Your selected time frame (from screen 1) for this adjustment.
Read-only.
Adjustment Type
Adjustment type (entered on screen 1).
Read-only.


Select jobs options
Select All (
 )—Selects all job check boxes in the table.
Deselect All (
 )—Clears all selected job check boxes in the table.
Job table
Displays jobs, which were selected on the Adjust Hours and Rates screen, to which the adjustment can be applied.
Select or clear check boxes as needed.
A job will be disabled if an adjustment has previously been added with the same description and time frame.
Previous
Takes you to the previous screen in the wizard.
Next
Takes you to the next screen in the wizard.
Screen 3 Define Amount
Options include:
-
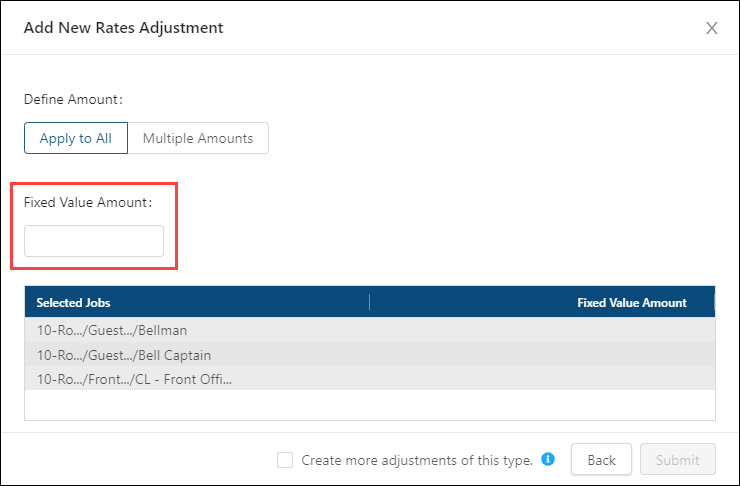
Apply to All—Select this option if you want to apply one amount to all of the jobs.
-
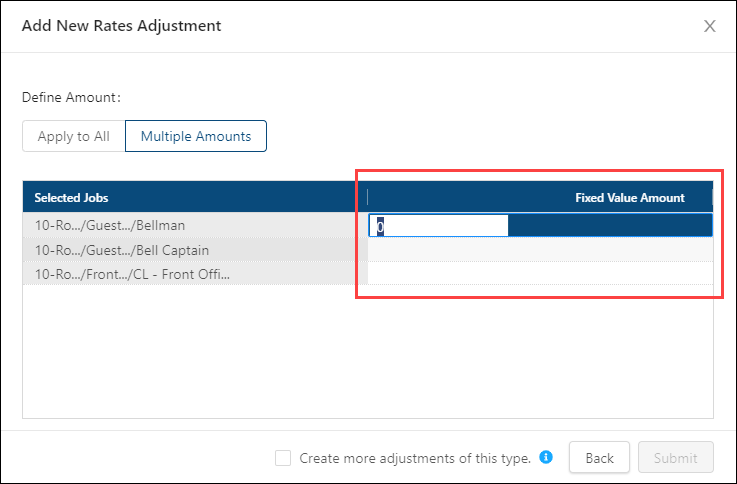
Multiple Amounts—Select this option if you want to apply different amounts to each job.
Default: Apply to All.
Fixed Value Amount
Enter the fixed adjustment amount to apply. This value is applied to all selected jobs in the table.
Appears only if:
-
The selected adjustment type is a fixed amount.
-
Apply to All is selected.
Percent Adjustment
Enter the percent adjustment amount to apply. This value is applied to all selected jobs in the table.
Appears only if:
-
The selected adjustment type is a % adjustment.
-
Apply to All is selected.
Selected Jobs (in the table)
Selected jobs to which the adjustment is applied.
Read-only.
Fixed Value Amount (in the table)
Fixed adjustment amount to apply.
Editable only if:
-
The selected adjustment type is a fixed amount.
-
Multiple Amounts is selected.
Percentage adjustment (in the table)
Percent adjustment amount to apply.
Editable only if:
- The selected adjustment type is a % adjustment.
- Multiple Amounts is selected.
Create more adjustments of this type
If selected, the adjustment wizard remains open so that you can add another adjustment with this name and type.
Although you do not need to enter the same values for additional adjustments, the same name and adjustment type are required.
After you have created more adjustments, you must clear the check box and select Submit to apply all adjustments and close the wizard.
Back
Takes you to the previous screen in the wizard.
Submit
Submits your changes and closes the wizard.
This button is available only if:
-
An adjustment is specified.
-
The Create more adjustments of this type check box is cleared.
-
-
-
In the Description / Title of Adjustment field, enter a description or title for the adjustment.
-
(Optional) In the Note field, enter a custom note about the adjustment.
-
In the Time Frame section, select one of the following options:
-
Period—Select this option if you want to select financial periods as your adjustment time frame.
or -
Specific Dates—Select this option if you want to specify calendar dates as your adjustment time frame.
-
-
Do one of the following:
-
If you selected Period as the Time Frame, select a Starting Period and an Ending Period from the drop-down lists.
-
If you selected Specific Dates as the Time Frame, enter a Start Date and an End Date by either typing the dates in the fields or selecting them from the calendar menus (
 ).
).
-
-
Select Next.
The next screen in the wizard opens. -
If necessary, select Edit Job Selection to open the Select Jobs or Op Codes dialog box where you can add and remove jobs and op codes for the adjustment.
-
In the Job Class table, select the jobs to add to the adjustment.
-
Select Next.
The next screen in the wizard opens. -
In the Define Amount section, select one of the following options:
-
Apply to All—Select this option if you want to apply one amount to all of the selected jobs.
or -
Multiple Amounts—Select this option if you want to apply different amounts to each job.
-
-
To add the adjustment amount, do one of the following:
-
If you selected Apply to All in the Define Amount section, enter a Percentage Adjustment or Fixed Value Amount.

Note: The adjustment amount field label depends on whether you are adding a fixed amount adjustment or a percent adjustment. If you are adding fixed amount adjustment, the field is Fixed Value Amount. If you are adding a percent adjustment, the field is Percentage Adjustment.
-
If you selected Multiple Amounts in the Define Amount section, double-click the Percentage Adjustment or Fixed Value Amount cells in the table and enter values for each job.

-
-
If you need to add more adjustments of this type, select Create more adjustments of this type and repeat steps 11 through 13.
-
Select Submit.
One of the following results occurs:-
If you are creating more adjustments of this type, the Add New Adjustment wizard remains open and returns you to the second screen of the wizard. (See steps 11 through 13.)
-
If you are not creating another adjustment of this type, the Add New Adjustment wizard closes.
A confirmation message appears on the Adjust Hours and Rates screen. You can then add new types of adjustments, if necessary.
-