Defining an approval level for a user in User Administration
The Authorization Levels tab of User Administration displays information about authorization levels for both user groups and specific users. You can define approval levels at both the group and user levels. Higher numeric values indicate a higher level of authorization.
If approval authorization levels are assigned at the group level, all users in that group have the same approval level.
Important: Defining an approval level for a user overrides the user’s group approval level. For example, if you assign an approval level of 7 to a user who is part of a group with an approval level of 5, the user’s new approval level is 7.
-
In the upper-left corner of the screen, select Access your applications (
 ).
).
The menu expands. -
Select Administration > User Administration.
The User Administration screen appears.
-
In the left menu pane, select Manage Users (
 ). This is the default view for the screen.
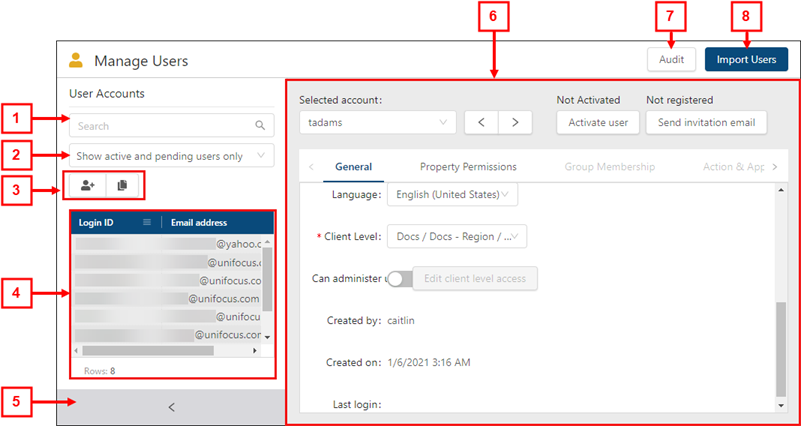
 Click here for field descriptions.

* Personally identifiable information has been obscured or altered in the above image.
Fields on the Manage Users view of the User Administration screen
# Field Description Notes 1

Search
Type your search criteria in the field. The table automatically updates to meet the search criteria.
Search criteria includes login ID, email address, last name, first name, and middle name.
2
Filter
Filter the User Accounts list by:
-
Show active and pending users only
-
Show inactive users only
-
Show all users
Default: Show active users only.
3
User Accounts controls
Add or clone a user account.
-
Add User (
 )—Create a new user.
 -
Clone User (
 )—Create a new user by making a copy of an existing user.
4
User Accounts list
Displays all existing user accounts by Login ID and the email address that is associated with the user. Select a user to view details in the tabs.
5
 /
/ 
Expand / Collapse
Expand or collapse the User Accounts pane.
6
Selected account
Displays the Login ID for the selected user account. From the drop-down list, you can select a different user account to view details.
7
 /
/ 
Previous / Next
View details for the previous (
 ) or next (
 ) user account in the list.
8
Activation status
Activate or deactivate the user. If the user is not active, they cannot log in to the Unifocus software.
-
Not Activated—If the user is not active, the status is Not Activated. To activate the user, select the Activate user button below the status.
-
Activated—If the user is active, the status displays the date that the user was activated. To deactivate the user, select the Deactivate user button below the status.
-
Deactivated—If the user was deactivated, the status displays the date that the user was deactivated. To reactivate the user, select the Activate user button below the status.
9
Send Invitation Email
Send an invitation email to the email address associated with the user account. The user is invited to register and create a password for their account.
10
Audit
View a history of changes to the screen.
11
Import Users
Create multiple users by importing a spreadsheet that contains user information.
12
Tabs
Navigate the tabs to view or edit details for the selected user.
-
General
-
Property Permissions
-
Group Membership
-
Action & Application Access
-
Data Permissions
-
Authorization Levels
-
Labor Structure Permissions
-
Budget Lines Access Rights
The available tabs depend on which view you are using.
-
-
From the User Accounts list, select the user for which to set authorization levels.
Details for the selected employee appear in the right pane. -
Select the Authorization Levels tab.
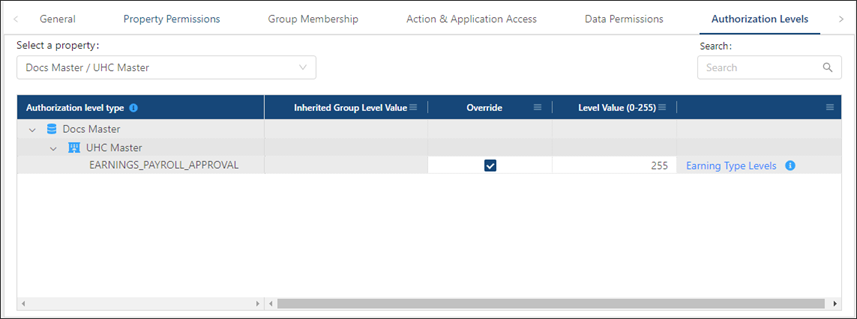
 Click here for field descriptions.

The image above shows the Authorization Levels tab for the Manage Users view.
Fields on the Authorization Levels tab of User Administration
Field Description Notes Controls
Select a property
From the drop-down menu, select the database and property with which this user or group is associated.
The default property is the property associated with the default database for the selected user or group.

Search
Enter a permission in the field. The table automatically updates to meet the search criteria.
Table
Authorization level type
Organized by database (
 ) and property (
  ), this tree menu displays the authorization level.
A group icon (
 ) appears next to permissions that were inherited from the group.
Read-only.
Inherited Group Level Value
The inherited approval level value for the user group to which the selected user belongs.
Read-only.
This column appears only if you are working with users in the Manage Users (
 ) view.
Override
Select the check box to override the group-level authorization value.
This column appears only if you are working with users in the Manage Users (
 ) view.
Level Value (0-255)
If the Override check box is not selected, this value indicates the group-level approval value for the user group.
If the Override check box is selected, you enter an approval level for the selected user. This value overrides the group-level value. Setting the value to blank reverts the value back to the group-level value.
These fields are blank by default and can be edited only if the Override check box is selected.
Earning Type Levels (
 )
)Opens the Existing Earning Type Levels dialog box, which lists all earning types for the parent property with an authorization level that is higher than zero. Earning types with a number less than or equal to the current Level Value can be edited by this user.
This column appears only if you are working with users in the Manage Users (
 ) view.
 -
If necessary, use the Select a property menu to change the property and/or the Search (
 ) field to filter the tree menu in the table. For more information, see Working with tabs in User Administration.
 -
(Optional) In the row of the earning type for which to define an approval level, select Earning Type Levels (
 ) to open the Existing Earning Type Levels dialog box, which lists all earning types for the parent property with an authorization level that is higher than zero. Earning types with a number less than or equal to the current Level Value can be edited by the selected user.
Note: Earnings with a level of zero do not require approval.
-
In the row of the earning type for which to define an approval level, select the Override check box.
The Level Value (0-255) field becomes available to edit. -
In the Level Value (0-255) field, type the approval level for the user.
Your updates are saved automatically. The approval level is applied to the user. If the user is part of a group, the authorization level defined at the user level overrides the level inherited from the group.