Viewing information in the Budget Tree screen
-
In the upper-left corner of the screen, select Access your applications (
 ).
).
The menu expands. -
Select Financial > Budgeting.
The Budgeting Dashboard screen appears.
-
Do one of the following:
To access a specific line from the Budgeting Dashboard:
In the left pane, double-click a line.
The Budget Tree screen opens to the selected line in the budget tree structure. The section of the budget structure appears partially expanded to display all totals at the same level in the tree menu.
To access the Budget Tree screen:
From the Budgeting menu pane, select Budget Tree (
 ).
).
The Budget Tree screen appears.
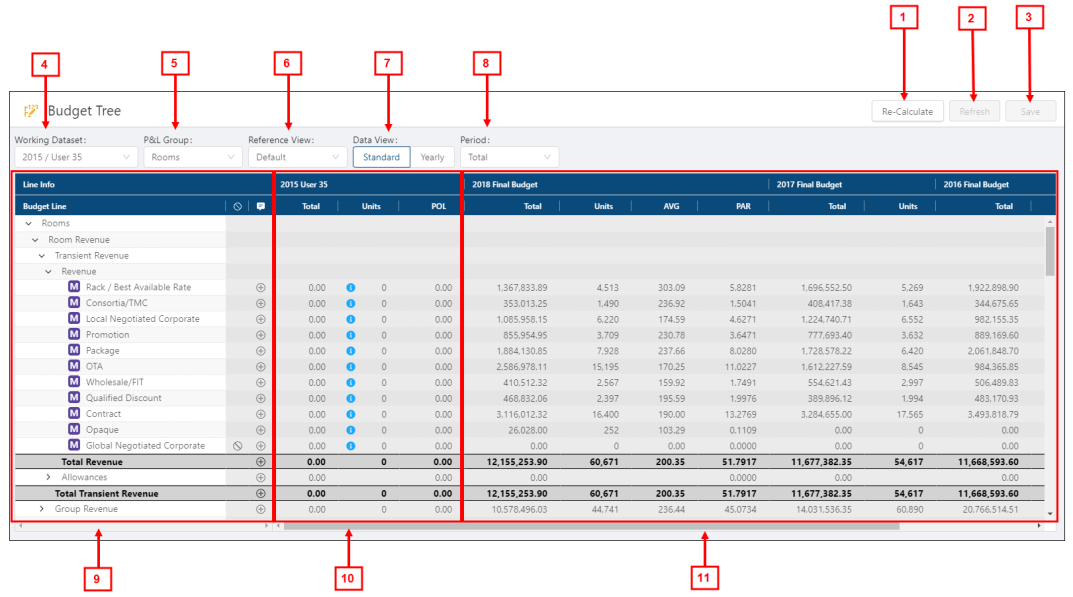
Note: The image above shows the Budget Tree screen with the Standard Data View selected.
Fields on the Budget Tree screen
| # | Field | Description | Notes |
|---|---|---|---|
|
|
Controls | ||
|
1 |
Re-Calculate / Import Actuals |
Re-Calculate—Recalculates your working dataset. Import Actuals—Opens the Import Actuals dialog box, where you select the P&L actuals dataset file to import. |
If Actuals is selected as the Working Dataset, the Re-Calculate button is replaced with the Import Actuals button. |
|
2 |
Refresh |
Contacts the database, pulls data from the last time you published, and then reverts the budget to the state of the last publication. |
|
|
3 |
Save |
Saves your changes to the database. For example, you will want to save the budget after you perform an hours and rate adjustment. |
This button is available only if you have edited a budget line. |
|
4 |
Working Dataset |
Change your working datasets. |
Default: Working dataset from the previous session. |
|
5 |
P&L Group |
Select the P&L group to work with. (You don't need to go back to the dashboard.) Select All to view all P&L groups. Important: Selecting all P&L groups will increase load, recalculation, and save times. Unifocus recommends only using this option to view data. Do not work in Budget Tree while viewing all P&L groups. |
Default: If you double-clicked a line in the Budgeting Dashboard, the Budget Tree opens to the P&L group line that you selected. Otherwise, the screen opens to the top level of your budget structure. If you exit the Budget Tree screen and then return during the same session, you return to your selected P&L group. |
|
6 |
Reference View |
Change your reference datasets, select a view., and specify the columns that appear in Budget Line section of the table. Tip: For best performance, Unifocus recommends selecting one to three reference datasets. |
Default: Your first configured reference view. The screen does not save the selected reference view from your previous session. You can change the default view. |
|
7 |
Data View |
Selects the time frame for which to view data. Options include:
|
Default: Standard view. If P&L Actuals is your working dataset, Yearly is the only available view. |
|
8 |
Period |
Select a financial period. |
This field appears only if the Standard view is selected. |
|
|
Table | ||
|
9 |
Budget Lines |
Tree menu of budget lines within your working dataset, which is organized by Budget Structure. Depending on your view configuration, the following columns are available:
|
Display or hide Notes, Account Code, and Inactive/Active Lines columns, in the Options tab of the Configure Views dialog box (Reference View > Add or Configure).
|
|
10 |
Working dataset |
Information for your working dataset, that is, the main budget that you are reviewing and editing. Lines with additional information display a blue information icon ( |
|
|
11 |
Datasets in the selected Reference View |
The datasets included in your selected reference view. A reference view can contain up to four reference datasets. There are two views:
Columns in Standard View include:
In Yearly view, the columns are grouped by financial periods. |
|
This page covers the following tasks:
Configuring the table view
The controls at the top of the screen allow you to set up the table to view information for your budget datasets.
-
In the upper-left corner of the screen, select Access your applications (
 ).
).
The menu expands. -
Select Financial > Budgeting.
The Budgeting Dashboard screen appears.
-
Do one of the following:
To access a specific line from the Budgeting Dashboard:
In the left pane, double-click a line.
The Budget Tree screen opens to the selected line in the budget tree structure. The section of the budget structure appears partially expanded to display all totals at the same level in the tree menu.
To access the Budget Tree screen:
From the Budgeting menu pane, select Budget Tree (
 ).
).
The Budget Tree screen appears.
-
From the Working Dataset drop-down lists, select the year and dataset that you want to use as the working dataset.
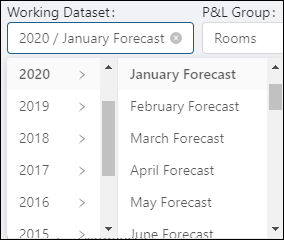
The working dataset is the budget dataset with which you will be budgeting revenue and expenses. -
From the P&L Group drop-down list, select the P&L group to view.
If you accessed the Budget Tree screen through the Budgeting navigation pane, the system defaults to the first P&L Group that is configured in your budget structure. If you accessed the Budget Tree screen by double-clicking a line in the Budgeting Dashboard, that line appears as the selected and displayed P&L Group in the Budget Tree screen. You can change the P&L Group by selecting a new one from the drop-down list. -
From the Reference View drop-down list, do one of the following:
To select previously configured reference view:
Select a configured reference view from the list.
To create a new view:
Select Add or Configure.
The Configure Views dialog box appears.Configure the view as necessary.
 Click here for field descriptions..
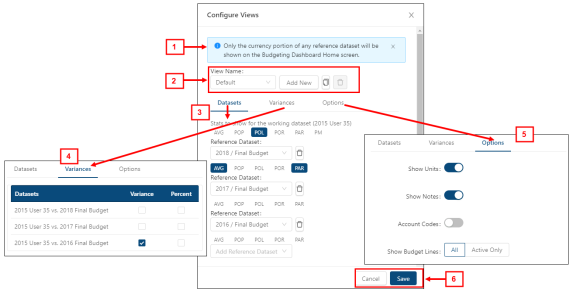
Fields on the Configure View dialog box
# Field Description Notes 1
Note
Informational note:
Only the currency portion of any reference dataset will be shown on the Budgeting Dashboard Home screen.
Read-only.
2 View controls View Name
Select the reference view to work with.
Default: Your most recent view. If this is the first time that you are configuring or editing the view, the default is Default.
Add New
Adds a new reference view.

Clone this view
Creates a clone of the selected reference view. You can then rename the cloned view.

Delete saved view
Deletes the selected reference view.
Button is available only if a view is selected.
Tabs 3
Datasets
Select the stats options to include in the working dataset.

Options include:
Delete
Stat types
AVG—Average = Total Budget Line Revenue or Expense ÷ Total Budget Line Units.
POP—Percent of Parent: calculates what percent a line is in relation to its parent line.
POL—Percent of Line: calculates what percent one line is of another line.
POR—Per Occupied Room: calculates the total monetary amount for the budget line divided by occupied rooms.
PAR—Per Available Room: calculates the total monetary amount for the budget line divided by available rooms.
PM—Performance Measure.
Select stat types for Reference Datasets (1 - 4)
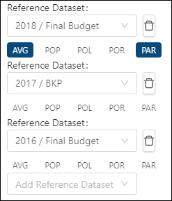
Options include:Reference Dataset Selector
Delete
Stat types:
AVG—Average.
POP—Percent of Parent: calculates what percent a line is in relation to its parent line.
POL—Percent of Line: calculates what percent one line is of another line.
POR—Per Occupied Room: calculates the total monetary amount for the budget line divided by occupied rooms.
PAR—Per Available Room: calculates the total monetary amount for the budget line divided by available rooms.
Notes on stat types:
AVG—If you choose to show Average, all lines that do not contain the same type of units will show a blank due to the line not containing units or a mixture of units (hours and KBIs).
POL—Percent of Line is configured on the first main screen of the Add Budget Line wizard or on the General tab of the Edit Budget Line dialog box.
POR—There needs to be a KBI with a code of TTLRMS to show POR.
PAR—There needs to be a KBI with a code of AVAILRMS to show PAR.
PM—Although all lines can have performance measures, Unifocus recommends applying performance measures (productivity, FTE or cost of labor percent) to job lines. Performance measures are configured on the second main screen of the Line-specific fields on the Add Budget Line wizard and the Edit Budget Line dialog box.
4
Variances
The Variances tab includes a table with the following columns:
Datasets—Read-only list of configured datasets.
Variance—Select to see variance between the working and reference dataset.
Percent—Select to see the percent variance between the working and reference dataset.
5
Options
Select information to display in the table:
Show Units
Show Notes
Account Codes
Show Budget Lines
All
Active only
Type of units are KBI or Hours (Regular and Overtime). Unifocus recommends showing all lines. The Budgeting software indicates whether a line is active or inactive in the working dataset.
6 Buttons Cancel
Closes the dialog box without applying your changes.
Save
Saves your changes and closes the dialog box.
Select Save.
Note: Reference views that you add or edit on Budget Tree screen are also available in the Budgeting Configuration screen.
For information on configuring and editing reference views, see the following:
-
Select one of the following Data View options:
Standard—Displays the totals, units, and stats for the selected working dataset and reference view. You can select which period data to view.
Yearly—Displays information that is organized by financial periods.
-
If you selected the Standard Data View, from the Period drop-down list, select the financial period for which to view data.
Note: If you selected Yearly as the Data View, the Period option is not available.
-
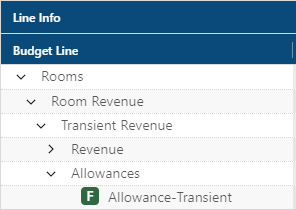
In the table, expand the tree menu to see details on datasets and budget lines.
-
(Optional) A blue information icon in a budget line row indicates that you can select the icon to see more information about the line. To view more information about the line, do the following:
Select the icon to review.
An information card appears.Review the information and do one of the following:
To take no action and close the card:
Select Dismiss.
The card closes.
To edit the line:
Select Edit.
The Edit Budget Line dialog box opens.Edit the lines as necessary.
For more information, see Editing a budget line in the Budget Tree screen.
Viewing information for table columns
Columns next to the budget tree display informational icons.
Select icons for information:
-
In the Inactive (
 ) column, an icon next to a budget line indicates that the line is inactive.
 -
In the Notes (
 ) column, a plus icon (
  ) indicates that you can add a note to the line. A note icon (
  ) indicates that a note has already been added.
Note: Display or hide Notes, Account Code, and Inactive/Active Lines columns, in the Options tab of the Configure Views dialog box (Reference View > Add or Configure).
For more information on notes, see Adding, editing, and viewing budget line notes in the Budget Tree screen .
Expanding and collapsing rows
-
To expand a Budget Line row, select the expand arrow (
 ).
). -
To collapse a Budget Line row, select the collapse arrow (
 ).
).
Expanding and collapsing columns
-
To expand a table column to display additional information, select the expand arrow (
 ) in the table header.
 -
To collapse an expanded column, select the collapse arrow (
 ) in the table header.
Moving columns in the table
-
Select a column heading and drag the column to the desired position.
Note: Your changes to column order are saved only for your current session. The screen reverts to its default column order when you sign out of the UniFocus software. UniFocus recommends keeping the columns in their original order.
Filtering the table
Several tables in the Budgeting software feature column settings. To use these settings, do the following:Hover your mouse pointer over a column heading.
A settings icon ( ) appears.
Select the column settings icon (
 ).
).
The column settings menu appears.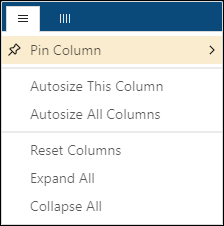
The menu includes two sections:Column settings (
 )
)Column filters (
 )
)Note: The column filters (
 ) are not available in RMS.
Select the desired options for settings (
 ):
):Pin Column—Pin the column to the left or right.
Autosize All Columns—Automatically set the optimal width for all columns in the table.
Reset Columns—Reset columns to their original width and position.
Expand All—Expands all sub-columns and -rows.
Collapse All—Collapses all sub-columns and -rows.
When you are done, select outside of the column settings menu.
Note: Column settings are saved only for your current session. The screen reverts to the default column selections when you sign out of the Unifocus software. Unifocus recommends keeping the default column selections.