Working with Time Off Requests in Employee Schedules
-
In the upper-left corner of the screen, select Access your applications (
 ).
).
The menu expands. -
Select Labor > Scheduling.
The Employee Schedules screen appears.Note: When you first access the Employee Schedules screen, you must select jobs for which to display scheduling information.

Fields on the Employee Schedules screen
| # | Field | Description | Notes |
|---|---|---|---|
| 1 | Controls for the planning period | ||

Planning Period |
Selects the planning period to view. |
The current planning period is indicated by an asterisk ( * ). |
|
|
Page forward / back buttons |
Moves backward or forward through planning periods. |
||
| 2 | Shift operations | ||

Cut selected shift |
Cuts the selected shift. For more information, see Cutting and pasting a shift in Employee Schedules. |
This button is available only if a shift is selected. |
|

Copy selected shift |
Copies the information for the selected scheduled shift so that you can create a new shift that is exactly like the original shift. For more information, see Copying a shift in Employee Schedules. |
This button is available only if a shift is selected. |
|

Paste into selected cell |
Pastes the cut shift into the selected cell on the schedule. For more information, see Cutting and pasting a shift in Employee Schedules. |
This button is available only if a shift is selected. |
|

Delete selected shift |
Deletes the selected shift. For more information, see Deleting a shift in Employee Schedules. |
This button is available only if a shift is selected. |
|

Undo |
Undoes your last scheduling action. |
This button is available only if a shift action can be undone. |
|
| 3 | Schedule operations | ||
|
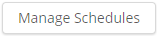
Manage Schedule |
Opens the Manage Schedules screen. | ||
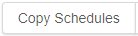
Copy Schedules |
Copies all filled shifts from one week to another week. This feature is helpful if you are not interested in using the Generate Schedules option for autoscheduling or if you are in a department where the schedule does not change much from planning period to planning period. |
||

Schedule actions |
Select one of the following options:
|
||
|
|
Prints the schedule for the selected pay period. |
||
| 4 | Sort and filter controls | ||
|
Search |
Search by employee name (and Employee ID, if available). The results are filtered dynamically as you type. The search functionality works alongside existing job filters to refine the view without overriding them. |
||
|
Sort |
Sorts information on the screen by the following options:
|
The field label changes depending on which option you select. By default, the screen is sorted by employee name. |
|
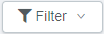
Filter |
Filters information on the screen by the following options:
|
||

View menu |
Use the View drop-down menu to select which informational columns appear in the scheduling pane, save your current view configurations, or manage previously saved views. There are also a few options for controlling how names and job titles appear. Options with check boxes can be selected or cleared. Options include:
For more information, see the Columns definitions below. |
||
|
Save Current View |
Saves your selected sort and filter options to the currently selected view. | ||
|
... Save New View |
Opens the Save New View dialog box where you can save your selected sort and filter options as a new view. | ||
| Scheduling pane | The scheduling pane displays a calendar view of shifts for the specified time period. | ||
|
5 |
Day of week / date |
Day of the week and date. The scheduling pane displays all days in the selected planning period. A green circle ( |
Format: Configurable. |
|
6 |
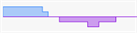
Daily coverage graphs |
Graphs display the following information:
|
|
|
7 |
Columns |
|
|
|
8 |
Open shifts |
Indicates the number, if any, of open shifts for the day for the selected job(s).
A green Open Shift bar preceded by a plus icon (
|
|
|
9 |
Collapse ( Expand ( |
Click the collapse button ( |
By default, each employee row is expanded to display all shift information. |
|
10 |
Employee information cell |
Includes:
|
Names that are too long will be truncated with an ellipsis. |
|
11 |
Availability bar |
Indicates that the employee has limited or no availability—either required or preferred—for that day.
Color codes for availability bars:
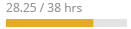
The length of color-coded overlays indicates availability for the day. For example, an employee who cannot work from 08:00 to 12:00 will have a dark gray bar that starts on the left and extends part way across the bar. If an employee prefers not to work on at all on a specific day, a striped blue bar will extend all the way across the bar. |
The availability bar is replaced by time off request label if there is a time off request for the day. |
|
12 |
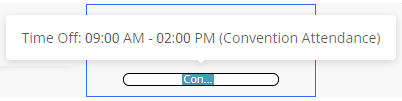
Time Off Request bar |
This bar is labeled with the type and times of pending time off requests, for example, Sick or Jury Duty. All-day time off requests take up the entire bar.
Partial-day time off requests take up only part of the bar.
If you hover the mouse pointer over the time off request bar, the tooltip provides more details about the time off request.
|
|
|
13 |
Label for the day |
Labels are associated only with a time frame in an employee's schedule; they are not associated with specific shifts. With labels, you can write custom messages about an employee. For example, you can use labels to make notes about days off required by employee unions. Labels appear at the top of shift cells. |
|
|
14 |
Employee scheduled shift cell |
Each employee scheduled shift cell contains some or all of the following information:
Selected shifts are highlighted. |
|
| Planning Period Summary pane | |||
|
15 |
Planning Period Summary table |
Display statistics and data about the schedule. |
|
| 16 | Planning Period Summary controls | ||
|
Show Daily Summary |
Select the check box to display the Planning Period Summary pane at the bottom of the screen. For more information, see Planning Period Summary pane in Employee Schedules. |
Default: All jobs selected. |
|
|
Job summary selector |
Select which job, or all jobs, for which to view summary information. |
||
|
Include Scheduled Secondary Jobs |
If selected, the Scheduled Hours total includes all shifts shown on the screen—regardless of whether the job is primary or secondary, or included in the job filter. If cleared, the Scheduled Hours total includes only those shifts for jobs currently selected in the job filter. |
Default: Selected. This setting does not affect the Projected Hours total, which always reflects the jobs included in the job filter. |
|
|
Show selected KBI Data |
Select to display the KBI pane. |
||
|
Select KBI |
Select to display the KBI selection pane, which determines the KBIs that are visible in the Planning Period Summary pane. |
||

 ) indicates that there is a holiday configured for the current date.

 )
) 


 )—Preferred time off.


 )—a scheduled shift violates a work rule. For example, the shift might put the employee into overtime.
Adding a time off request
-
Do one of the following:
-
In the schedule pane, right-click a cell and select Add Time Off Request from the pop-up menu.
The Time Off Request pane appears. The Start Date and End Date fields are populated with the selected date. -
In the employee information cell, hover the mouse pointer over the down arrow (
 ) and select Add Time Off Request from the drop-down list.
The Time Off Request pane appears. The Start Date and End Date fields are populated with first day of the selected planning period.Note: If you are not adding a time off request for the first day of the selected planning period, you should first update the Start Date and End Date display the desired date before continuing to the next steps.
 Click here for field descriptions.
Fields for the Time Off Request pane
Field Description Notes Employee
Name of the employee.
Time Off Type
The type of requested time off.
The available time off types are configured in Setup.
Accrual Type table
This table display accrual type information for the employee.
Columns that appear in standard configuration:
-
Accrual Type—Accrual type that is configured for the employee.
-
Before— Accrued hours prior to this request.
-
After— Remaining hours after the request is taken.
Rows are configurable for desired time off types.
The columns and rows that appear depend on your system configuration. They are configured in Setup.
Distribute Hours
Opens the Distribute Hours Per Day dialog box.
For more information, see Distribute Hours Per Day dialog box in Employee Schedules
Request Status
Change the status of the time off type:
-
Pending
-
Denied
-
Approved
-
Canceled
Start Date / End Date
Enter the start and end dates of the time off request.
All-day request
Select whether the time off request is for the entire day or for part of the day.
Default: All-day request is selected.
Request Time
Enter the start and end times of the request.
These fields appear only if All-day request is switched off.
Paid Time
Amount of time for paid time off.
Paid time is configurable in days, hours, and minutes.
Manager Comment
Custom text entered by the manager.
Employee Comment
Custom text entered by the employee who submitted the request.
If submitted by an employee via the Mobile App, then this field is populated with the employee's comment.
Audit history
Record of what changes were made and who entered the changes.
Read-only.
Cancel
Close the Time Off Request pane without submitting your changes.
Submit Request
Submit the time off request.
-
-
-
In the Time Off Type field, select a time off type by hovering the mouse pointer over the ellipsis button (
 ) and selecting the time off type from the drop-down menu.
 -
If you need to distribute hours for the time off request, do the following:
-
Select Distribute Hours.
The Distribute Hours Per Day dialog box appears.Click here for field descriptions.
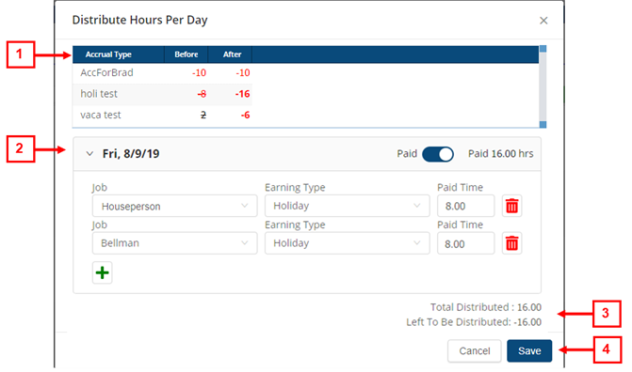
Fields for the Distribute Hours Per Day dialog box
# Field Description Notes 1
Accrual Type table The table displays configured accrual balances for the employee. Accrual Type
Configured accrual type for the employee.
Read-only.
Before
Accrual balance before time off is entered.
Read-only.
After
Accrual balance after time off is entered.
This number updates as you enter Paid Time.
Read-only.
2
Distribution details The section contains a row for each distribution.
Paid /Unpaid
Select whether to distribute requested time off to paid earnings.
If not selected, it will not create an earning.
Job
From the drop-down list, select another job for the hours distribution.
Earning Type
From the drop-down list, select another earning type to apply.
Paid Time
Enter the number of hours to be distributed to this job and earning type.

Delete
Delete the distribution.

Add distribution
Creates a new row to add another distribution.
3
Distribution hours Total Distributed
Total number of hours distributed based on the paid hours requested.
Read-only.
Left To Be Distributed
Number of remaining hours that need to be distributed.
Read-only.
4 Buttons Cancel
Closes the dialog box without applying your changes.
Save
Applies your changes and closes the dialog box.
-
Set the switch to Paid.
The section for the selected date expands. -
In the Job field, hover the mouse pointer over the ellipsis button (
 ) and select a job for the distribution.
 -
In the Earning Type field, hover the mouse pointer over the ellipsis button (
 ) and select the earning type for the distribution.
 -
In the Paid Time field, type the hours of paid time to be distributed.
-
To add another distribution, select the add new distribution button (
 ) and repeat steps c through e.
 -
Select Save.
The distribution is saved. -
If necessary, select a different Request Status option.
-
If you are submitting a partial-day time off request, do the following:
-
Set the All-day request switch to ON.
The section expands. -
Enter the partial-day request start and end times.
-
-
In the Paid Time field, type the number of hours for the time off request.
-
(Optional) In the Manager Comment text box, type your comment about the request.
-
(Optional) In the Employee Comment text box, type the comment from the employee requesting time off.
-
Select Submit Request.
The request is submitted, and a time off request bar appears in the schedule pane.
-
Editing a time off request
-
In the schedule pane, right-click a cell with a time off request and select Edit Time Off Request from the pop-up menu.
The Time Off Request pane opens. -
Edit the fields as necessary.
Click here for field descriptions.
Fields for the Time Off Request pane
Field Description Notes Employee
Name of the employee.
Time Off Type
The type of requested time off.
The available time off types are configured in Setup.
Accrual Type table
This table display accrual type information for the employee.
Columns that appear in standard configuration:
-
Accrual Type—Accrual type that is configured for the employee.
-
Before— Accrued hours prior to this request.
-
After— Remaining hours after the request is taken.
Rows are configurable for desired time off types.
The columns and rows that appear depend on your system configuration. They are configured in Setup.
Distribute Hours
Opens the Distribute Hours Per Day dialog box.
For more information, see Distribute Hours Per Day dialog box in Employee Schedules
Request Status
Change the status of the time off type:
-
Pending
-
Denied
-
Approved
-
Canceled
Start Date / End Date
Enter the start and end dates of the time off request.
All-day request
Select whether the time off request is for the entire day or for part of the day.
Default: All-day request is selected.
Request Time
Enter the start and end times of the request.
These fields appear only if All-day request is switched off.
Paid Time
Amount of time for paid time off.
Paid time is configurable in days, hours, and minutes.
Manager Comment
Custom text entered by the manager.
Employee Comment
Custom text entered by the employee who submitted the request.
If submitted by an employee via the Mobile App, then this field is populated with the employee's comment.
Audit history
Record of what changes were made and who entered the changes.
Read-only.
Cancel
Close the Time Off Request pane without submitting your changes.
Submit Request
Submit the time off request.
-
-
Select Submit Request.
The update is submitted.
Canceling a time off request
Note: One you add a request, you cannot delete it. However, you can change its status to Canceled.
-
In the schedule pane, right-click a cell with a time off request and select Edit Time Off Request from the pop-up menu.
The Time Off Request pane opens.Click here for field descriptions.
Fields for the Time Off Request pane
Field Description Notes Employee
Name of the employee.
Time Off Type
The type of requested time off.
The available time off types are configured in Setup.
Accrual Type table
This table display accrual type information for the employee.
Columns that appear in standard configuration:
-
Accrual Type—Accrual type that is configured for the employee.
-
Before— Accrued hours prior to this request.
-
After— Remaining hours after the request is taken.
Rows are configurable for desired time off types.
The columns and rows that appear depend on your system configuration. They are configured in Setup.
Distribute Hours
Opens the Distribute Hours Per Day dialog box.
For more information, see Distribute Hours Per Day dialog box in Employee Schedules
Request Status
Change the status of the time off type:
-
Pending
-
Denied
-
Approved
-
Canceled
Start Date / End Date
Enter the start and end dates of the time off request.
All-day request
Select whether the time off request is for the entire day or for part of the day.
Default: All-day request is selected.
Request Time
Enter the start and end times of the request.
These fields appear only if All-day request is switched off.
Paid Time
Amount of time for paid time off.
Paid time is configurable in days, hours, and minutes.
Manager Comment
Custom text entered by the manager.
Employee Comment
Custom text entered by the employee who submitted the request.
If submitted by an employee via the Mobile App, then this field is populated with the employee's comment.
Audit history
Record of what changes were made and who entered the changes.
Read-only.
Cancel
Close the Time Off Request pane without submitting your changes.
Submit Request
Submit the time off request.
-
-
In the Request Status section, select Canceled.
-
(Optional) In the Manager Comment text box, type a reason for the cancellation
-
Select Submit Request.
The time off request is canceled, and the time off request bar is removed from the schedule pane.