Working with labor structure permissions for a user
From the Labor Structure Permissions tab of User Administration, you add labor structure levels and then select permissions for those levels.
This page describes the following tasks:
Accessing the Labor Structure Permissions tab for a user
-
In the upper-left corner of the screen, select Access your applications (
 ).
).
The menu expands. -
Select Administration > User Administration.
The User Administration screen appears.
-
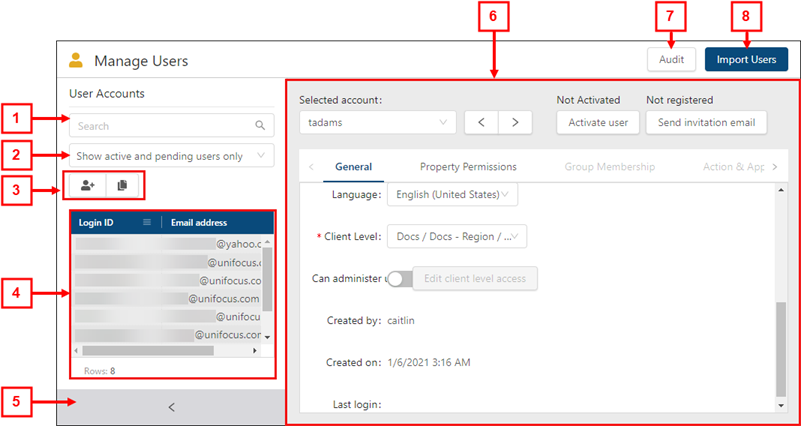
In the left menu pane, select Manage Users (
 ). This is the default view for the screen.
 Click here for field descriptions.

* Personally identifiable information has been obscured or altered in the above image.
Fields on the Manage Users view of the User Administration screen
# Field Description Notes 1

Search
Type your search criteria in the field. The table automatically updates to meet the search criteria.
Search criteria includes login ID, email address, last name, first name, and middle name.
2
Filter
Filter the User Accounts list by:
-
Show active and pending users only
-
Show inactive users only
-
Show all users
Default: Show active users only.
3
User Accounts controls
Add or clone a user account.
-
Add User (
 )—Create a new user.
 -
Clone User (
 )—Create a new user by making a copy of an existing user.
4
User Accounts list
Displays all existing user accounts by Login ID and the email address that is associated with the user. Select a user to view details in the tabs.
5
 /
/ 
Expand / Collapse
Expand or collapse the User Accounts pane.
6
Selected account
Displays the Login ID for the selected user account. From the drop-down list, you can select a different user account to view details.
7
 /
/ 
Previous / Next
View details for the previous (
 ) or next (
 ) user account in the list.
8
Activation status
Activate or deactivate the user. If the user is not active, they cannot log in to the Unifocus software.
-
Not Activated—If the user is not active, the status is Not Activated. To activate the user, select the Activate user button below the status.
-
Activated—If the user is active, the status displays the date that the user was activated. To deactivate the user, select the Deactivate user button below the status.
-
Deactivated—If the user was deactivated, the status displays the date that the user was deactivated. To reactivate the user, select the Activate user button below the status.
9
Send Invitation Email
Send an invitation email to the email address associated with the user account. The user is invited to register and create a password for their account.
10
Audit
View a history of changes to the screen.
11
Import Users
Create multiple users by importing a spreadsheet that contains user information.
12
Tabs
Navigate the tabs to view or edit details for the selected user.
-
General
-
Property Permissions
-
Group Membership
-
Action & Application Access
-
Data Permissions
-
Authorization Levels
-
Labor Structure Permissions
-
Budget Lines Access Rights
The available tabs depend on which view you are using.
-
-
From the User Accounts list, select the user for which to set authorization levels.
Details for the selected employee appear in the right pane. -
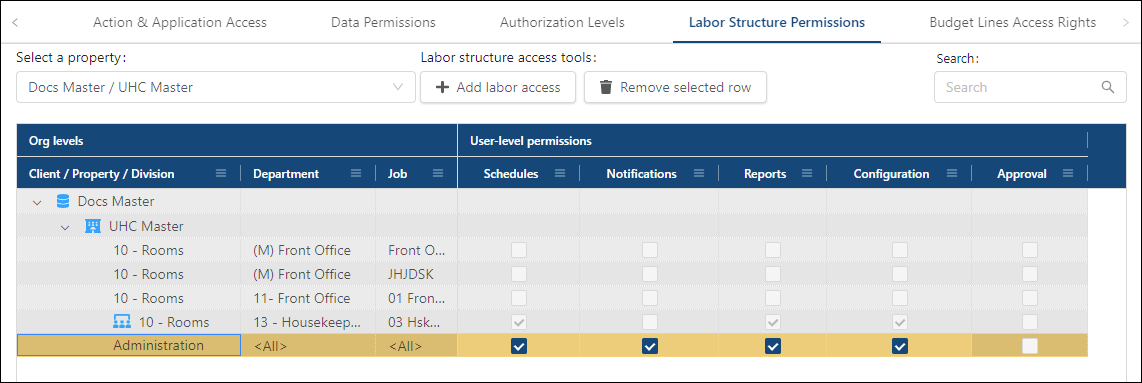
Select the Labor Structure Permissions tab.
 Click here for field descriptions.

The image above shows the Labor Structure Permissions tab for the Manage Groups view.
Fields on the Labor Structure Permissions tab of User Administration
Field Description Notes Controls Select a property
From the drop-down menu, select the database and property with which this user or group is associated.
The default property is the property associated with the default database for the selected user or group.
Labor structure access tools
Options include:
-
Add labor access (
 )—Add a labor structure item.
 -
Remove selected row (
 )—Removes the selected row from the table.
The Remove selected row (
 ) button is available only if a row is selected.
Search
Enter a permission in the field. The table automatically updates to meet the search criteria.
Table Org levels The Org levels columns display the five organization levels: Client > Property > Division > Department > Job.
Client / Property / Division
Organized by database (
 ) and property (
  ), this tree menu displays a list of clients, properties, and divisions.
 A group icon (
 ) appears next to permissions that were inherited from the group.
Department
Displays all configured departments.
Job
Displays all configured jobs.
User-/ Group level permissions Schedules
Determines the available options in the Division/Department/Job selectors throughout Labor and Time & Attendance. If the check box is selected, the user can select divisions, departments, or jobs for those items.
Notifications
Notify the employee's manager with employee alerts (for example, Late Employees, In But Not Scheduled, and Late to Clock Out). If the check box is cleared, the manager does not receive alerts.
Reports
Determines the user's ability to run reports for the labor items that you specify.
Configuration
Determines the user's ability to modify the configuration of the labor items that you specify.
Approval
Determines the user's ability to approve schedules in the Schedule Approvals screens. For more information, see Setting up Schedule Approvals.
When setting up new users, the Approval check box is the only check box that is not selected by default.
-
-
If necessary, use the Select a property menu to change the property and/or the Search (
 ) field to filter the tree menu in the table. For more information, see Working with tabs in User Administration.
Adding and removing labor structure access for a user
On the Labor Structure Permissions tab of User Administration, you can add or remove rules that set a level of labor structure access.
Note: Adding or removing rows does not technically add or remove access. The rows that you add or delete represent a labor access configuration rule.
Adding access
-
If necessary, expand the Client / Property / Division tree menu under the Org levels section to find the organization level.
-
Do one of the following:
-
Select Add labor access (
 ).
).
or -
Right-click the table and select Add labor access.
The Add labor access dialog box appearsNote: The tree menu in the dialog box displays only labor structure levels to which the user has access.
If a labor structure level has already been added, the option is unavailable for selection in the dialog box.
-
-
Select the organization level to which to add access.
-
Select Add.
A new row is added to the table.
Removing access
-
If necessary, expand the Client / Property / Division tree menu under the Org levels section to find the organization level.
-
In the table, select the row to remove.
-
Do one of the following:
Select Remove selected row (
 ).
).
orRight-click the row and select Remove selected row.
-
Select Remove rule.
The row is removed from the table.
Setting labor structure permissions for a user
-
If necessary, expand the Client / Property / Division tree menu under the Org levels section to find the organization level.
-
In the User-level permissions section, select the check boxes for the items to which the user is granted access.

Options include:Schedules—Determines the available options in the Division/Department/Job selectors throughout Labor and Time & Attendance. If the check box is selected, the user can select divisions, departments, or jobs for those items.
Notifications—Notify the employee's manager with employee alerts (for example, Late Employees, In But Not Scheduled, and Late to Clock Out). If the check box is cleared, the manager does not receive alerts.
Reports—Determines the user's ability to run reports for the labor items that you specify.
Configuration—Determines the user's ability to modify the configuration of the labor items that you specify.
Approval—Determines the user's ability to approve schedules in the Schedule Approvals screens. For more information, see Setting up Schedule Approvals.
Your updates are saved automatically.