Working with the Corporate Export Payroll screen
Use the Corporate Export Payroll screen to export payroll files that have been created by individual properties within your organization.
-
In the upper-left corner of the screen, select Access your applications (
 ).
).
The menu expands. -
In the menu pane, select Administration > Corporate > Corporate Export Payroll.
The Corporate Export Payroll screen appears.

Fields on the Corporate Export Payroll screen
| Field | Description | Notes |
|---|---|---|
| Controls | ||
|
Export Files |
Runs the task of exporting the selected file(s). |
This field is enabled only if files are selected. If you are exporting a single or merged file, a dialog box appears prompting you to enter a name and file extension for the file. If you are exporting multiple files, RMS exports the files as .csv files and stores them in a .zip folder. |
|
Export End Date |
End date of the pay period for which to export files. |
Default: End date for the current pay period for your property. |
| Merge Files | If selected, the files that you selected in the table are combined into a single file upon export. | Default: Cleared. |
| Remove Headers From Secondary Files | If selected, header names are not repeated in merged files. |
This field is enabled only if Merge Files is selected. Default: Cleared. |
|
Filter By Config Name |
Type all or part of the Config Name for the file you want to display in the table. The table updates based on your entry. |
|
|
Filter |
Opens a drop-down list where you can select which types of files you want to display in the table. Options include:
|
Default selection:
|
|
Column settings |
Expands the column settings pane where you can select which columns appear in the table. |
Default: Collapsed. |
| Table | ||
|
Select |
If selected, the file is included in the export. |
Default: Cleared. |
|
Config Name |
Name of the file. The name in this column matches the Config Name in Interfaces. |
|
|
Prop ID |
Unique identifier for the property to which the file applies. |
|
|
Property |
Name of the property to which the file applies. |
|
|
Export Start Date |
Start date for the selected pay period. |
|
|
Export End Date |
End date for the selected pay period. |
|
|
File Type |
Type of data contained in the file: payroll data or employee data. |
|
|
File Name |
Name of the uploaded file. |
|
|
Uploaded On |
Date and time when the file was uploaded to Interfaces. |
|
|
Uploaded By |
Username of the individual who imported the file. |
|
|
Exported On |
Date and time when the file was last exported. |
|
|
Exported By |
Username of the individual who last exported the file. |
|
This page provides instructions for the following tasks:
Searching the table
-
In the Filter By Config Name (
 ) field, type all or part of the Config Name for the file you want to display in the table.
The table updates based on your entry.
Filtering the table
If necessary, filter the table by the type(s) of file you that want to display in the table.
-
From the Filter (
 ) drop-down list, select the check box(es) for the file type(s) that you want to display in the table.
Table updates to display only files matching the selected file types.
Exporting a corporate payroll file
-
In the Export End Date field, select the end date for the pay period for which you want to export files.
-
In the table, select the check box for each file that you want to include in the export.
-
(Optional) To combine multiple files upon export, select Merge Files.
-
(Optional) To remove duplicate headers in merged files, select Remove Headers From Secondary Files.
-
In the upper right corner of the screen, select Export Files.
One of the following results occur:-
If you selected only one file or if you selected the Merge Files check box, a dialog box appears prompting you to enter a name and file extension for the exported file.
A pending task appears at the bottom of the screen. When the process is finished, a Task Completed dialog box appears. -
If you selected multiple files, the software exports the files as .csv files and stores them in a .zip folder.
A pending task appears at the bottom of the screen. When the process is finished, a Task Completed dialog box appears.
-
-
Do one of the following:
-
To download the exported file(s),
-
Select Download.
A file manager window appears. -
Select a destination for the downloaded file.
-
(Optional) Enter a new File name.
-
Select Save.
The exported file is saved to the specified destination.
-
-
To close the dialog box, select X.
-
To close the dialog box and refresh the screen, select Go to App.
-
To close the dialog box and open the My Processes screen, select Details.
The My Processes screen opens in a separate tab. On this screen, you can view details about the process.
-
Using column filters
-
At the right side of a column header, select the column settings icon (
 ).
).
The column settings menu appears.
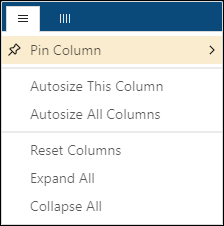
The menu includes two sections:Column settings (
 )
)Column filters (
 )
)
Note: The column filters (
 ) are not available in RMS. See Using column filters below for information on hiding and displaying columns.
 -
Select the desired options for settings (
 ).
).Note: The available options depend on the screen you are using.
Common options include:
-
Pin Column—Pin the column to the left or right.
-
Autosize All Columns—Automatically set the optimal width for all columns in the table.
-
Reset Columns—Reset columns to their original width and position.
-
Expand All—Expands all sub-columns and -rows.
-
Collapse All—Collapses all sub-columns and -rows.
-
Hide This Column—Hides the column in the table.
-
-
When you are done, select outside of the column settings menu.
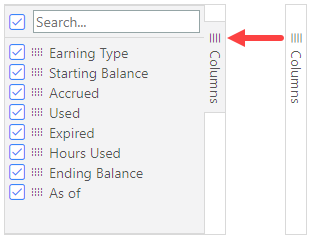
Some tables feature column filters at the right of the table. By default, these filters are collapsed.
-
To the right side of a table, select the column filter (
 ).
).
The table-level column filter expands.
Note: The filter options match the column headers in the table. The image above is an example from the Benefits screen. The available options depend on the table you are filtering.
-
Select the check boxes for the columns you that want to display. Clear the check boxes for the columns that you want to hide.
Note: Column settings are saved only for your current session. The screen reverts to the default column selections when you sign out of the Unifocus software. Unifocus recommends keeping the default column selections.
