Working with schedules in Timeline Scheduling
When using Timeline Scheduling, "schedules" refer to planned, filled (or scheduled) shifts that are required to complete work for a specific time frame. The Shift Operations menu provides several features that can be used for developing work schedules.
-
In the upper-left corner of the screen, select Access your applications (
 ).
).
The menu expands. -
Select Labor > Timeline Scheduling.
The Timeline Scheduling screen appears.
When you first open the Timeline Scheduling screen, a single timeline view opens with the Job view selected.
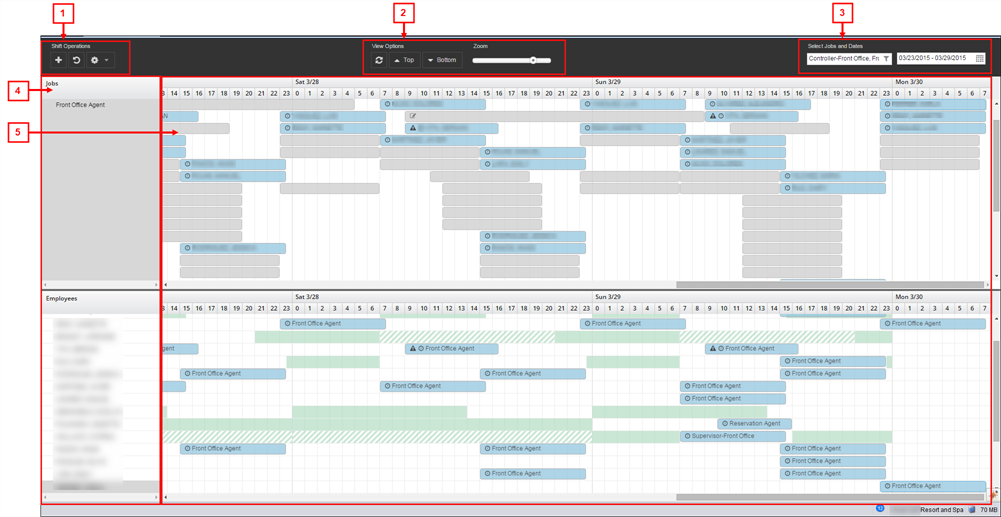
Operations section – control descriptions
| # | Control | Description | Notes |
|---|---|---|---|
|
1 |
Shift Operations |
||
|
|
Add Shift |
Opens the Add Shift dialog box. For more information, see the following: |
|
|
|
Undo |
Undoes the most recent action. |
|
|
|
Gear |
Opens a drop-down list to select the following:
|
If you clear all schedules using the Clear Schedules option, this action cannot be undone. If you clear all shifts using the Clear Shifts option, this action cannot be undone. The Recalculate Shifts option is used mainly by Unifocus Service Desk and Implementation.
|
|
2 |
View Options |
||
|
|
Refresh |
Refreshes the views in the Timeline Scheduling screen. |
This feature is helpful if you have added or edited many shifts and want to ensure that you are viewing the most current schedule that has been updated with all of your changes. |
|
|
Top |
Opens drop-down list to select the following:
When using single-timeline view, use the view you see in the scheduling section. When using dual-timeline view, use this drop-down list to select the view for the top panes in the scheduling section. |
The Work Content view applies only to event-related job standard types. |
|
|
Bottom |
Opens drop-down list to select the following:
When using dual-timeline views, use this drop-down list to select the view for the bottom panes in the scheduling section. |
The Bottom drop-down menu applies only to the dual-timeline schedule views. The Work Content view applies only to event-related job standard types. |
|
|
Zoom slider |
Zooms in and out of the timelines in the schedule panes.
For more information, see Working with the scheduling section of Timeline Scheduling. |
|
|
3 |
Select Jobs and Dates |
||
|
|
Job selector |
Opens the Labor Selector dialog box. Use this dialog box to filter what types of job and employee groupings appear in the left pane. For more information, see Labor Selector dialog box in Timeline Scheduling. |
|
|
|
Calendar selection |
Opens drop-down menu to select the date range that appears in the schedule pane. |
|

Scheduling section
You use the scheduling section to schedule labor and view work content, workflow, and statistics. This section contains two panes: the left pane and the schedule pane. If you are using dual-timeline views, there is a left and schedule pane for each view.
| # | Pane | Description | Notes |
|---|---|---|---|
|
4 |
Left pane(s)
|
Depending on your selected view, this pane displays:
|
Read-only. |
|
5 |
Schedule pane(s) |
This pane displays the timeline that correspond to the selected view in the left pane. The appearance of the timeline in this schedule pane depends on the zoom magnification. If the zoom slider is moved all the way to the left (zoomed out), the timeline displays each day as a separate entry. If the zoom slider is moved all the way to the right (zoomed in), you see an hourly breakdown of each day. Shifts and work content appear as bars on the schedule. |
|
Generating schedules
Prerequisites:
-
Configure thorough, accurate employee availability.
-
Enter all time-off requests.
Generating schedules autoschedule employees. When you generate schedules, the software assigns employees to all unfilled, planned shifts.
-
In the Shift Operations section, select the gear menu (
 ).
). -
From the drop-down list, select Generate Schedules.
The Generate Schedules dialog box appears. -
Complete the fields as necessary.
 Click here for field descriptions.
Fields on the Generate Schedules dialog box
Field Description Notes Pre-Schedules
Selects Pre-Schedule schedule type, which schedules employees with pre-schedules entered.
Default: Cleared.
Permanent
Selects Permanent schedule type, which schedules employees with permanent schedules.
Default: Cleared.
Regular
Selects Regular schedule type, which schedules employees with regular schedules.
Default: Cleared.
Variable
Selects Variable schedule type, which schedules employees with variable schedules
Default: Cleared.
Clear Selections
Clears all check boxes in the Job Selector section.
Expand All
Expands the tree menu in the Job Selector section.
Collapse All
Collapses the tree menu in the Job Selector section.
Job Selector
Tree menu and check boxes for all organization layers (divisions, departments, and jobs) at the property.
Default: The selected check boxes are the jobs that have been selected for scheduling from the Select Jobs and Dates section on The Timeline Scheduling screen
The tree menu is organized with the following levels:
-
Property
-
Division
-
Department
-
Jobs
-
-
-
Clear Schedules
Check box to clear all schedules and then regenerate for all shifts.
Select this check box if you want to clear all shifts, start over, and autoschedule all shifts.
Do not select if you want Timeline Scheduling to only fill any remaining unfilled shifts.
OK
Applies your changes and closes the dialog box.
Cancel
Closes the dialog box without applying your changes.
-
-
Select OK.
A Generating Schedules progress bar appears. When the progress bar reaches 100 percent, the schedules have been successfully generated. A Success dialog box appears. It confirms that the schedule was successfully generated. -
Select OK.
The Success dialog box closes.
Copying schedules
When you copy a schedule, you can copy all filled shifts from one week to another week. This feature is helpful if you are not interested in using the Generate Schedules option for autoscheduling or if you are in a department where the schedule does not change much from planning period to planning period.
Note: Copying schedules does not affect projected hours, which are based on forecast business volumes for the current planning period.
-
In the Shift Operations section, select the gear menu (
). -
From the drop-down list, select Copy Schedules.
The Generate Schedules dialog box appears. -
Complete the fields as necessary.
-
Select OK.
A Copying Schedules progress bar appears. When the progress bar reaches 100 percent, the schedules have been successfully copied. A Success dialog box appears. It confirms that the schedule was successfully copied. -
Select OK.
The Success dialog box closes. All selected scheduled shifts are copied to the specified week.
Clearing schedules and shifts
Clearing schedules
Clearing schedules remove all assigned employees from the planned shifts. Use this option if you want to completely start over with the process of assigning planned shifts.
-
In the Shift Operations section, select the gear menu (
). -
From the drop-down list, select Clear Schedules.
The Clear Schedules dialog box appears. Because you cannot undo the action, the message asks if you are sure you want to clear all shifts.Warning: After the schedules have been cleared, you cannot undo this action.
-
Select Yes.
The Clear Schedules dialog box closes. All scheduled shifts are cleared from the schedule pane. In the Jobs view, the shift bars return to an unplanned status.
Clearing shifts
Clearing shifts deletes all shifts and removes the shift bars from the schedule pane. This feature is useful if you want to create your own shifts rather than use the planned shifts that are available on the schedule pane.
Remember: Clearing schedules unassigns all scheduled shifts; however, the shift bars remain on the schedule pane.Clearing shifts deletes all shifts and removes the shift bars from the schedule pane.
-
In the Shift Operations section, select the gear menu (
). -
From the drop-down list, select Clear Shifts.
The Clear Shifts dialog box appears. Because you cannot undo the action, the message asks if you are sure you want to clear all shifts.Warning: After the shifts have been cleared, you cannot undo this action.
-
Select Yes.
The Clear Shifts dialog box closes. All scheduled shifts are cleared from the schedule pane.