Planning menu
From the Planning menu, you can review and run all available labor planning tasks for your organization. The Planning menu includes the following task screens:
- Enter Forecast Environments screen
- Enter Pre-Work screen
- Import Forecast KBIs pane
- Enter Input KBI Forecast screen
- Generate Rooms Forecast pane
- Edit Rooms Forecast screen
- Generate Revenue Center Forecasts pane
- Edit Revenue Center screen
- Generate Projected Hours dialog box
- Generate Schedules dialog box
- Export Schedules dialog box
- Manage Schedules screen
- Enter Scheduled Hours screen

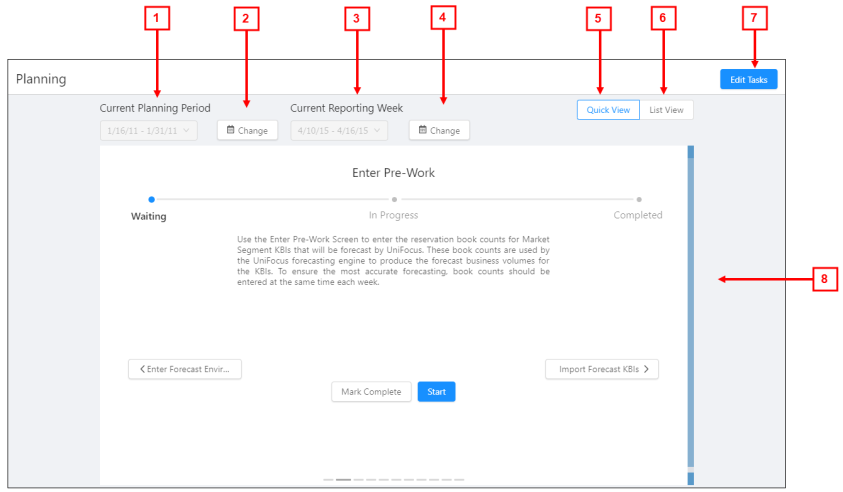
| # | Field | Description | Notes |
|---|---|---|---|
|
1 |
Current Planning Period |
Displays the selected planning period. |
This field is read-only until you click the (2) Change button to select a different planning period. |
|
2 |
Change |
Opens the Current Planning Period drop-down. Options to change the planning period include weeks from six months prior to the current planning period to six months after. |
|
|
3 |
Current Reporting Week |
Displays the selected reported week. |
This field appears only for properties who use planning periods that exceed a week. This field is read-only until you click the (4) Change button to select a different planning period. |
|
4 |
Change |
Opens the Current Reporting Week drop-down. Options to change the reporting week include weeks from six months prior to the current planning period to six months after. |
This button appears only for properties who use planning periods that exceed a week. |
|
5 |
Displays information in the tasks section in a sequential format. Begin the task by selecting the Start button ( |
The first time you access the Planning screen, Quick View is selected by default |
|
|
6 |
Displays all tasks in a scrolling list view. All tasks appear on a single page. Begin the task by hovering over the current status and selecting Start.
|
|
|
|
7 |
Edit Tasks |
Opens the Edit Tasks List pane, where you add or remove the planning tasks that you want to appear in the task section. |
|
|
8 |
Task section |
Displays information and initial actions for planning tasks. Click the links below for more information: |
The appearance of the task section depends which view you select: Quick View or List View. |
Note: If you have permission to change the reporting week, the screen will display a Reporting Week field. This date selection field works that same way as the (1) Current Planning Period field and (2) Change button.
Quick View
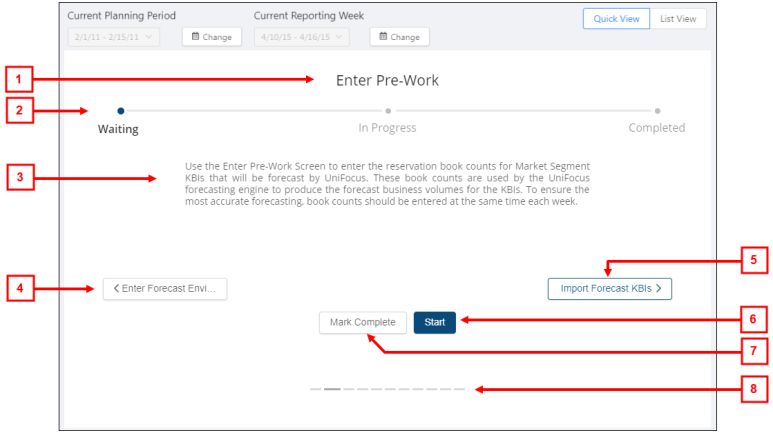
The Quick View provides a sequential walk-through of tasks in your planning process. Each step displays a task summary screen from which you can access the task screen or mark the task complete.

| # | Field | Description | Notes |
|---|---|---|---|
|
1 |
Task/screen name |
Name of the planning task. |
Read-only. |
|
2 |
Progress bar |
Displays the status of the task in a timeline graphic. |
Read-only. |
|
3 |
Description of task |
Summary of the task. |
Read-only. |
|
4 |
Previous screen |
Takes you to the previous task summary screen in the planning process. |
The first task does not have a previous button. |
|
5 |
Next Screen button |
Takes you to the next task summary screen in the planning process. |
|
|
6 |
Mark Complete |
Changes the tasks status to Complete. |
|
|
7 |
Start / Update |
The button you see depends on whether you started the task.
|
If you have not started the task, the Start button appears. If you have already started a task and are now resume working, the Update button appears. |
|
8 |
Screen selectors |
A graphical indication of the number of tasks in your planning process. Select a dashed line to go to the task summary screen. |
|
List View
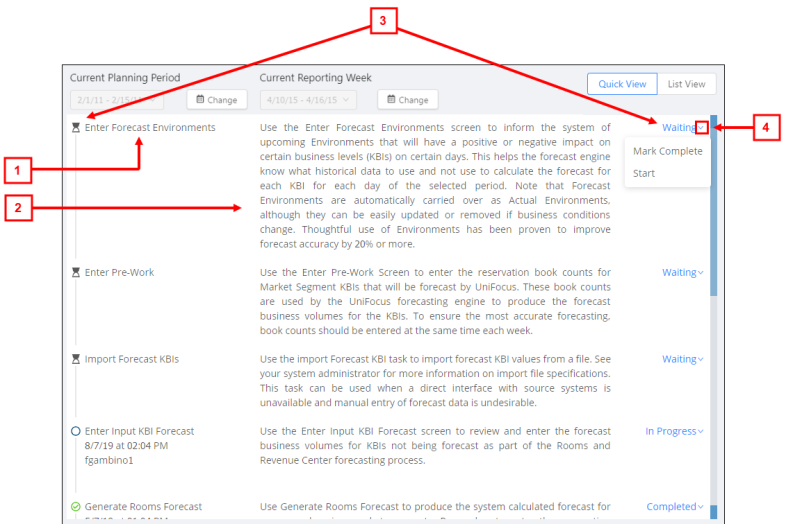
The List View provides a scrolling list view of tasks in your planning process. Use the menu to the right of each task summary to access a task screen or mark a task as complete.

| # | Field | Description | Notes |
|---|---|---|---|
|
1 |
Task/screen name |
Name of the planning task. |
Read-only. |
|
2 |
Description of task |
Summary of the task. |
Read-only. |
|
3 |
Task status |
Both a textual and graphical indicator of the task's status. |
Read-only. |
|
4 |
Task actions |
Opens a drop-down menu of available tasks. |
|
 ).
).