Adding a scheduled task in Reporter
In Reporter, you can schedule reports to automatically run on specific days and times. For example, you might schedule the Labor Productivity report to run every Monday afternoon so that you can review productivity for the previous week.
Note: You can also schedule reports from the Task Setup screen of Task Scheduler.
Note: In Reporter, you can only schedule the report with which you are working. In Task Scheduler, you can schedule multiple reports as part of the same task.
- In the upper-left corner of the screen, select Access your applications (
 ).
).
The menu expands. -
Select Reports > Reporter.
The Reporter screen appears.
-
On the Reporter screen, select the report that you want to run as a scheduled task. If necessary, you can search by report names or filter by tags to find the report.
The report configuration screen opens in a separate tab. -
In the Parameter Sets section, select the parameter set to be associated with the report that you are scheduling.
-
In the Scheduled Tasks section, select the add button (
 ).
).
The Select Reports dialog box appears. -
Do the following:
-
If necessary, select the Select check box.
-
If necessary, from the Parameter Set drop-down list select the parameter set to be applied.
-
From the Date Range drop-down list, select the date range for the scheduled report.
-
-
Select OK.
The Select Reports dialog box closes, and the Create New Task wizard of the Task Setup screen opens in a separate tab. -
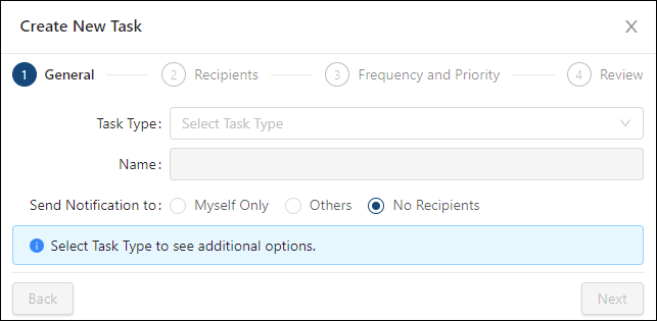
On General screen, enter the general information for the scheduled: task type, name, and whether notifications are sent to you, others, or no recipients.
Additional fields appear based on your selections. Field descriptions of the 1. General screen
Fields on the 1. General screen of the Create New/Edit/Duplicate Task wizard
Field Description Notes Task Type
Select the task type from the drop-down list. Options include:
-
Calculate Attendance—Runs the Employee Points work rules and gives employees points when the employees' punches are outside of the established parameters. The purpose of this task is to record and report attendance infractions such as absenteeism, tardiness, early arrival, late departure, long breaks, and meals.
-
Calculate Forecast Accuracy—Runs algorithms to calculate both system and manager revenue center forecast accuracy.
-
Generate Projected Hours—Generates a forecast for the number of hours required to meet projected business volumes.
-
Generate Revenue Center Forecast—Generates a business volume forecast for your revenue centers.
-
Generate Rooms Forecast—Generates a forecast for rooms, arrivals, departures, and guests for transient market segments.
-
Generate Schedules—Generates a schedule based on labor requirement, regular schedules you might have created, each employee's required and preferred time off, and all jobs that an employee is trained to work.
-
Generate Standard Hours—Calculates how many hours of labor each job should have used to meet actual business volumes.
-
Import Forecast KBI Data—Imports forecast information from external, third-party systems such as a property management system (PMS) to populate forecast KBI data.
-
Open New Planning Period—Closes last week's forecast period and rolls the date forward to begin forecasting for the upcoming week.
-
Populate Revenue Data—Generates revenue data information in RMS.
-
Pre-Shift Screening Notifications—Sends notifications to employees who have an active survey on a specified number of minutes before their shift. The number of minutes is defined in an Employee Alerts work rule.
-
Project Accruals—Projects benefit accruals based on the Benefit Accrual work rules for the current pay period.
-
Reconcile Employees—Reconciles RMS employee information with information from an external, third-party system and updates accordingly.
-
Reports—Schedules reports to run automatically. Reports can also be scheduled from Reporter.
-
Update Pre-Shift Screening Schedules—Enables surveys for employees based on their schedules for the next 24 hours.
The fields on the General screen of the wizard update based on the selected task type.
Name
Name of the task.
You can use the autogenerated name, edit the autogenerated name as necessary, or enter a new name in the field.
Names are autogenerated for all task types.
This field appears for all task types.
Send Notification to:
Select one of the following options to specify who will receive notifications about the task:
-
Myself Only
-
Others
-
No Recipients
This field appears for all task types.
Run As System User?
When turned on (
 ), the task can be run as a system user (Property Admin or All Properties Admin). This ensures that scheduled tasks do not depend on a specific user and will continue to run if the user who created the task has been deactivated.
This toggle appears only if tasks are selected. Reports cannot be scheduled as a system user.
Number of Days Back To Begin Calculation
Begins the calculation for the specified number of days before the task run date.
This setting also accounts for the time of the scheduled task. For example, if a task is scheduled for 12:00 (12 PM) on Monday and is set for 7 days back, it will gather data from 7 days ago at 12:00 (12 PM) and up to the scheduled task’s run time of 12:00 (12 PM) on Monday.
This field appears for the following task type:
-
Calculate Forecast Accuracy
Numeric.
Labor Structure / Edit
Specify the levels of the labor structure for which the task will run.
Select Edit to open the Select Labor Structure dialog box, where you select the levels of the labor structure.
This field appears for the following task types:
-
Generate Projected Hours
-
Generate Schedules
-
Generate Standard Hours
Weeks to process before planning period start
Projects hours back to the specified number of weeks before the current planning period.
This field appears for the following task type:
-
Generate Projected Hours
Numeric.
1 – 4.
Weeks to process after planning period end
Projects hours up to the specified number of weeks after the current planning period.
This field appears for the following task type:
-
Generate Projected Hours
Numeric.
1 – 4.
Standard Set
Change the standard set for which projected hours are generated. By default, projected hours are generated for the standard set specified in the Property Labor/Scheduler Setup screen.
This field appears for the following task types:
-
Generate Projected Hours
-
Generate Standard Hours
Default: Default (the standard set that is defined in the Property Labor/Scheduler Setup screen).
Rotate Days Off
Select the check box if you want to rotate the days that employees are off.
This field appears for the following task type:
-
Generate Schedules
Days to process (before yesterday)
Offsets generated standard hours for the specified number of past days of actual KBI volumes.
This field appears for the following task type:
-
Generate Standard Hours
Default: 21
Numeric.
1 – 35.
Clear Schedule
Select the checkbox to clear schedules when the tasks are run.
This field appears for the following task types:
-
Generate Projected Hours
-
Generate Schedules
Default: The checkbox is not selected.
Recalculate KBIs
If selected, the Generate Projected Hours task will recalculate all calculated KBIs as part of the generation process.
This field appears for the following task type:
-
Generate Projected Hours
Back
Return to the previous screen in the wizard.
This button is unavailable on the first screen of the wizard.
Next
Go to the next screen in the wizard.
This button is available only if you have entered data into all required fields.
-
-
Select Next.
One of the following results occur:-
If you started a task that requires notifications, the 2. Recipients screen appears.
-
If you started a task that does not require notifications, the 3. Frequency and Priority screen appears.
-
-
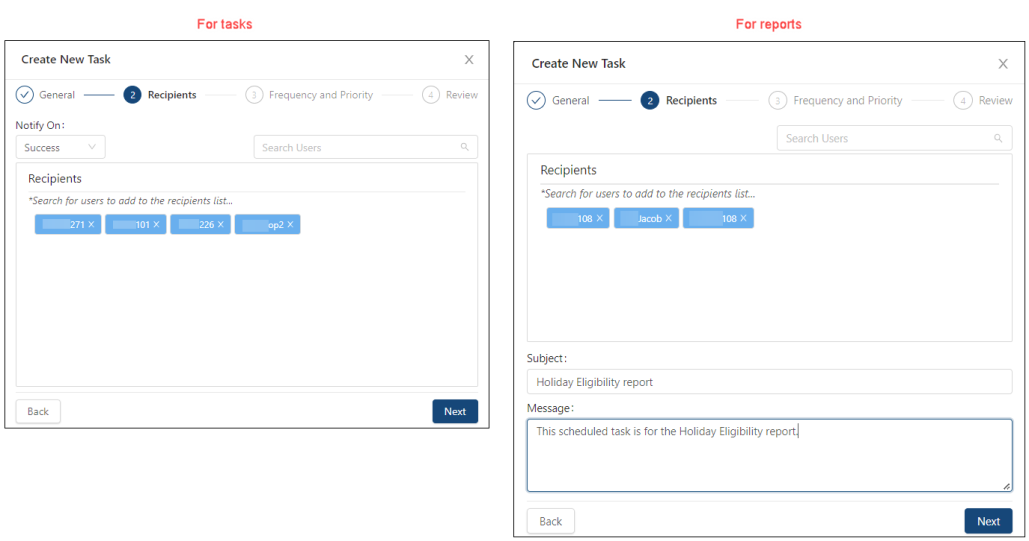
If your task requires notifications, on the Recipients screen, specify which users should receive the notification. By default, no users are selected.
Field descriptions of the 2. Recipients screen
Fields on the 2. Recipients screen of the Create New/Edit/Duplicate Task wizard
Field Description Notes Notify On
Select whether tasks are notified on success, failure, or both.
This field is not available for reports.
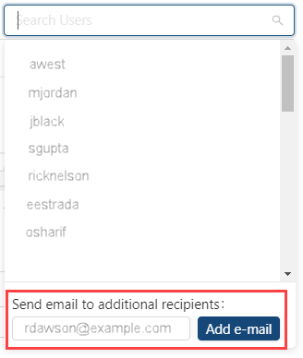
Search Users

Search by user ID or add a new user. Do one of the following:
-
To search for existing users:
-
Select the Search Users (
 ) field and select a user from the resulting drop-down list.
or -
In the Search Users (
) field, enter an ID in the field.
As you type, the list updates based on your entry.
Select the user from the filtered list.
-
-
To add a new, non-RMS user:
-
Select the Search Users (
) field. -
In the Send email to additional recipients field at the bottom of the drop-down menu, enter the user's email address.
-
Select Add e-mail.
-
The list of users populates based your database access. If a user is mapped to an employee record, the user's name from the employee record appears. If a user is not mapped to an employee record, the user's login ID appears.
Users must have a valid email address.
Recipients
Each selected recipient's user name appears in a tag. To remove a recipient, select the X in the tag.
This field is populated only if you select users.
Subject
Subject line of the notification message.
This field is only available for reports.
Message
Message content of the notification.
This field is only available for reports.
Back
Return to the previous screen in the wizard.
Next
Go to the next screen in the wizard.
This button is available only if you have entered data into all required fields.
-
In the Search Users (
) field, either select a user from the drop-down list or enter a username in the field. -
In the Subject field, enter the subject line of the notification.
-
In the Message field, enter the notification message.
-
Select Next.
The 3. Frequency and Priority screen appears.
-
-
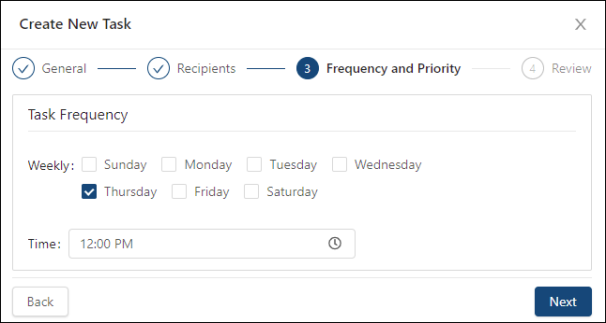
On the Frequency and Priority screen, specify how frequently the task will be run.
Field descriptions of the 3. Frequency and Priority screen
Fields on the 3. Frequency and Priority screen of the Create New/Edit/Duplicate Task wizard
Field Description Notes Task Frequency
-
Weekly—Select the weekday(s) when the task will run.
-
Time—Enter the time of day when the task will run.
Tip: You can specify only one run time for a task. If the run time varies for a task that will run multiple times per week, you can create a separate scheduled task with the same settings but specify a different Time. Duplicating a task is helpful for these scenarios.
If a task can be run for multiple days, you can select multiple weekdays. If a task can only be run once a week, you can only select one day. Multi-select for other weekdays will not be available.
Back
Return to the previous screen in the wizard.
Next
Go to the next screen in the wizard. This button is available only if you have entered data into all required fields.
-
-
Select Next.
The 4. Review screen appears. It displays a summary of your scheduled task. -
Review the read-only information on the Review screen. If your need to edit your task, select Back and edit the previous wizard screen as necessary.
Field descriptions of the 4. Review screen
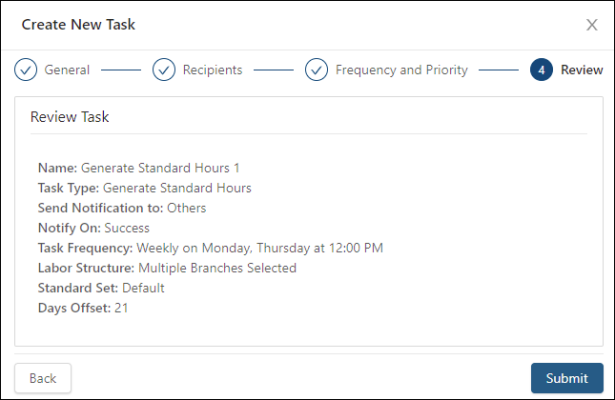
Fields on the 4. Review screen of the Create New/Edit/Duplicate Task wizard
Field Description Notes Tasks details
The details for the task depend on your configurations in the previous screens. For field descriptions, see the following help pages:
Read-only.
Back
Return to the previous screen in the wizard.
Submit
Submit your notification configuration and close the wizard.
-
Select Submit.
A Success message appears. Your task is saved and scheduled.